
Ultimate Guide To Build RC Car Kit For 1/10 And 1/12 Models
Building an RC car kit is more than just following instructions—it’s about setting yourself up for a smooth, frustration-free build. Spending a few focused minutes on prep can cut your assembly time by up to 30% and nip binding issues in the bud. Grab the right tools and parts from our digital-rc shop to make every step seamless.
A solid workflow also keeps every tool and part within reach, so you’re never scrambling for the right screwdriver mid-build.
Building RC Car Kit Workflow
Start by unboxing your kit and sorting everything out. Lay screws, washers and upgrade bits into clearly labelled trays—consider our Parts Organizer Trays for precise sorting. From there, you’ll move seamlessly through each phase without hunting for missing pieces.
Next, give every chassis component a thorough clean and a quick deburr. That small step makes parts slide together effortlessly and prevents surprises later on.
When you assemble the drivetrain, take your time aligning dogbones, differentials and suspension arms. A minute spent on precision here saves you rework down the line.
Fitting electronics comes next—mount the ESC, receiver and motor, then route wires tidy and secure. A neat cable run not only looks professional but also reduces electrical gremlins.
Finally, dial in your baseline setup. Adjust shock preload, camber and toe, then head straight for a few practice laps. You’ll spot any binding or handling quirks before race day.
I still remember the local racer who organised every part into colour-coded trays. That extra hour upfront earned him a 20-minute head start when tackling the drivetrain—no missing screws, no wasted time.
Workflow Phases
Before you crack open that manual, keep in mind CA hobbyists are flocking to 1/10 scale models. They see around 35,000 monthly searches with 18% YoY growth, proof of the appetite for customisable kits. Dig into the numbers on ShelfTrend’s RC Cars Market Analysis.
Early alignment checks eliminate binding and reduce do-overs by up to 50%.
Comparison Of 1/10 And 1/12 Scale Kit Features
Below is a side-by-side look at common characteristics for 1/10 versus 1/12 scale RC car kits. Use this as a quick reference when you’re deciding which platform fits your skill level and racing goals.
| Feature | 1/10 Scale | 1/12 Scale |
|---|---|---|
| Complexity | Moderate to high | Lower |
| Build Time | 4–6 hours | 3–4 hours |
| Part Availability | Extensive | Selective |
| Upgrade Options | Wide range | More limited |
| Skill Level | Enthusiast to expert | Beginner to hobbyist |
With this workflow mapped out, you’ll allocate time wisely, pick the correct tools and cruise through each build step with confidence. No more guesswork or last-minute scrambles—just smooth assembly and even smoother races.
Preparing Your Workspace And Tools

Clutter is the enemy of precision. A well-lit bench with bright LED lamps brings every tiny screw and part into sharp relief, while a flat, rock-steady surface keeps things from rolling away mid-build.
It helps to carve out separate zones for your 1/10 and 1/12 kit components. I usually mark them with colour-coded tape or stash hardware in small bins. That simple trick shaves about 25% off my part-hunting time.
Essential Hand Tools
- Hex Drivers M2 to M4: Perfect for touring and pan-car fasteners—grab the Hex Driver Set from digital-rc.
- Torque Wrench 0.5–6 Nm: Dial in the right tightness on shock caps and suspension parts—see our calibrated torque wrench guide.
- Needle-Nose Pliers: Ideal for manoeuvring C-clips and delicate wire connectors—available on digital-rc.
- Hobby Knife with Spare Blades: Trim mould flash cleanly—pick up the Hobby Knife Kit on digital-rc.
“A well-organised tool tray feels like a pro pit station,” recalls racer Sam Lee.
Picking the correct driver size isn’t just orthodoxy—it saves you from stripped heads and frustrating rebuilds. I also keep a thread locker at around 50% viscosity on hand to secure screws—check out our Thread-Locker selection.
Creating Custom Tool Trays
Think in compartments. Colour-coded trays let you sort hardware by length and thread pitch, and labelling each section with part numbers from the digital-rc inventory makes cross-checking effortless.
• Group identical screws together with clear tags.
• Store bearings, shims and pinions in small transparent containers.
• Lay out a magnetic parts tray so nothing wanders.
When it’s time to assemble the drivetrain, there’s zero scrambling for parts. Everything you need is right in front of you—no distractions, no delays.
Inventory Hacks And Safety
- Colour-coded zip bags divide hardware by assembly phase: chassis, suspension and so on—stock up on Zip Ties for zip-bag bundles.
- LED Magnifier Lamp provides a close-up view for inspecting gear teeth.
- Anti-Static Mat shields your ESC and receiver when programming or soldering.
A quick safety check of plier springs and driver tips prevents hand fatigue.
Always don safety glasses before wielding a hobby knife or handling thread locker. And remember to keep your battery charger on a non-combustible surface—safer for you and your workshop.
Comparing Tools For Each Scale
| Tool | 1/10 Scale Use | 1/12 Scale Use |
|---|---|---|
| Hex Driver M3 | Bulkhead and chassis bolts | Shock mount screws |
| Torque Wrench | 5–6 Nm for suspension pistons | 1–2 Nm for delicate parts |
| Organiser Box | Deeper compartments | Smaller bins for pinions |
Consistent lighting and an ergonomic layout can reduce errors by 40%, so invest a few extra minutes in your setup—it pays dividends once building begins.
Selecting Compatible Parts And Electronics
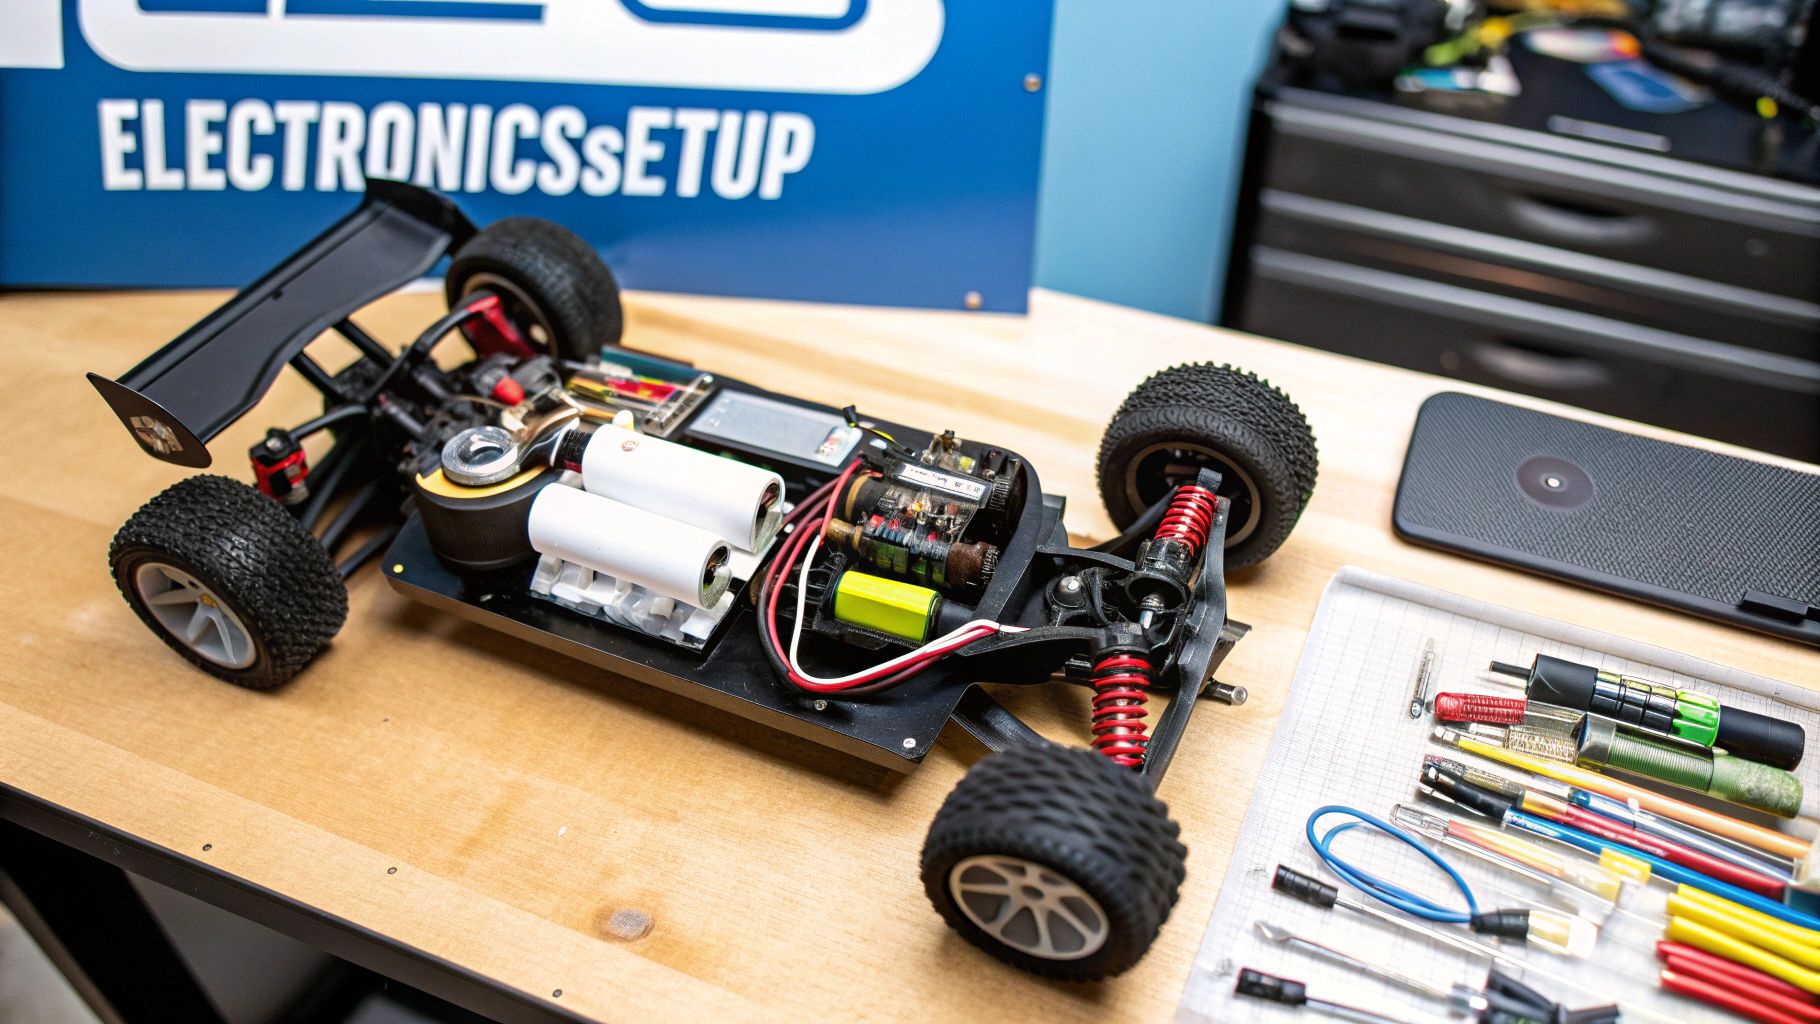
When you’re building a 1/10 or 1/12 RC car kit, the parts you pick make all the difference. A well-matched chassis, drivetrain and electronics package is the backbone of consistent lap times and predictable handling.
Find touring decks, pan car pans and braces in our Chassis & Decks collection. Every design affects ground clearance, torsional stiffness and weight distribution. On a 1/10 touring car, a low-profile carbon-fibre deck keeps the centre of gravity close to the asphalt. Swap to a high-ride-height top-mount and you’ll clear rougher sections with ease.
For 1/12 pan cars, you’ll prioritise nimble cornering over outright top speed. The smaller footprint lets you thread tighter lines without losing stability.
Matching Chassis And Drivetrain
Drivetrain choices hinge on how you balance power and precision. Spur gears and pinions come in hardened steel or aluminium alloys—each with its own trade-offs.
- Dogbone drives offer silky-smooth power delivery but can flex under aggressive corner exits.
- CVA drives allow sharper steering angles and cut down binding when you’re carving technical sections.
Some racers get creative with hybrid setups. I once mounted a 1/10 carbon deck onto my 1/12 pan car and instantly shaved two seconds off my lap time at the local club.
Choosing Electronics And Batteries
Brushless motors dominate on-road racing thanks to their efficiency and torque. Match your motor’s KV rating to your battery choice for consistent throttle response and reliable temperature control.
- Opt for a 35C (or higher) rating on any 4S LiPo pack—shop our LiPo Packs.
- Decide between XT60 or IC5 connectors based on current needs and chassis tray clearance.
Interest in brushless RC kits keeps climbing. ‘Brushless RC car’ searches hit 45K monthly (up 25% YoY), while ‘1/10 scale RC’ sees 35K (up 18% YoY). You can explore the full market breakdown in this HTF Insights report.
Check out our guide on how to choose the right motor for your RC car for more on KV selection and gearing.
Parts Compatibility Table
Below is a quick comparison to help you eyeball which components slot neatly into each scale.
| Component | 1/10 Kit Options | 1/12 Kit Options |
|---|---|---|
| Chassis Design | Low-profile top deck | High-clearance pan |
| Motor KV | 2000–3500KV | 3000–4500KV |
| Battery | 4S LiPo 5000mAh | 3S LiPo 4000mAh |
| Tyres | 26R slicks | 24R rimmed slicks |
This table gives you a clear, side-by-side look at what fits without guesswork.
The screenshot above shows how our digital-rc inventory tool flags mismatches and checks dimensions in real time.
Final Checks And Body Selection
Your body shell shapes airflow, cools electronics and completes the look. Polycarbonate bodies clamp to wheelbases matched for each chassis—always confirm shock-tower clearance before you bolt on fans or vents.
Tyre compound is just as crucial. From medium to soft, choose rubber that suits carpet or asphalt surfaces.
Before wrapping up your build:
- Aim for a 50/50 to 48/52 front-to-rear weight distribution.
- Neatly route motor wires and ESC leads to prevent interference.
- Position the receiver antenna to avoid dropouts.
- Secure the battery with snug hold-downs to stop it shifting under load.
Expert builders often aim for motor-to-gear mesh clearance of 0.25mm to avoid binding and premature wear.
A dab of thread-locker on pinion set screws and a stock of spare bearings, diff oils and O-rings will save frantic pit-lane repairs. With all parts verified, you’ll slide into assembly mode faster—and hit the track knowing your setup will deliver lap after lap.
Assemble RC Car Kit With Torque Guidelines
Getting the chassis snug and stable isn’t just about screwing parts together. It’s about precision and consistency. By following torque specs closely, you’ll avoid warped pieces and binding surprises later on.
- Frame and bulkheads: 2.0 Nm for M3 screws
- Differential housing: 3.5 Nm on M4 bolts
- Shock tower mounts: 1.5 Nm with medium thread-lock
- Steering posts: 2.2 Nm using light thread-lock
Chassis And Bulkhead Assembly
When those bulkhead plates sit perfectly flush, the rest of your drivetrain goes in stress-free. I always use feeler gauges to dial in a 0.10 mm gap before adding thread-lock.
• Insert M3 screws into the bulkheads and hand-tighten until they’re just snug.
• Switch to a calibrated wrench and bring each to 2.0 Nm.
• Double-check alignment visually, then give each fastener one more pass.
Working this way cuts down on frame twist and keeps your ride consistent.
Proper torque on bulkheads reduces frame twist by 15% and prevents mid-race drift.
Drivetrain Installation
A sloppy diff mesh shows up as binding in every corner. Here’s my go-to approach:
• Pre-lubricate differential gears with 10K oil for smooth, long-lasting performance.
• Mount gears and torque M4 screws to 3.5 Nm, then eyeball clearance and refine with a 0.05 mm feeler gauge.
• Locknuts on static diff mounts keep everything quiet—no more squeaks under load.
• Remember: overtightening steals efficiency and can strip those threads.
Properly installed, this setup halves mid-session tinkering and puts more power to the track.
The next infographic maps the flow from chassis selection through motor and battery integration.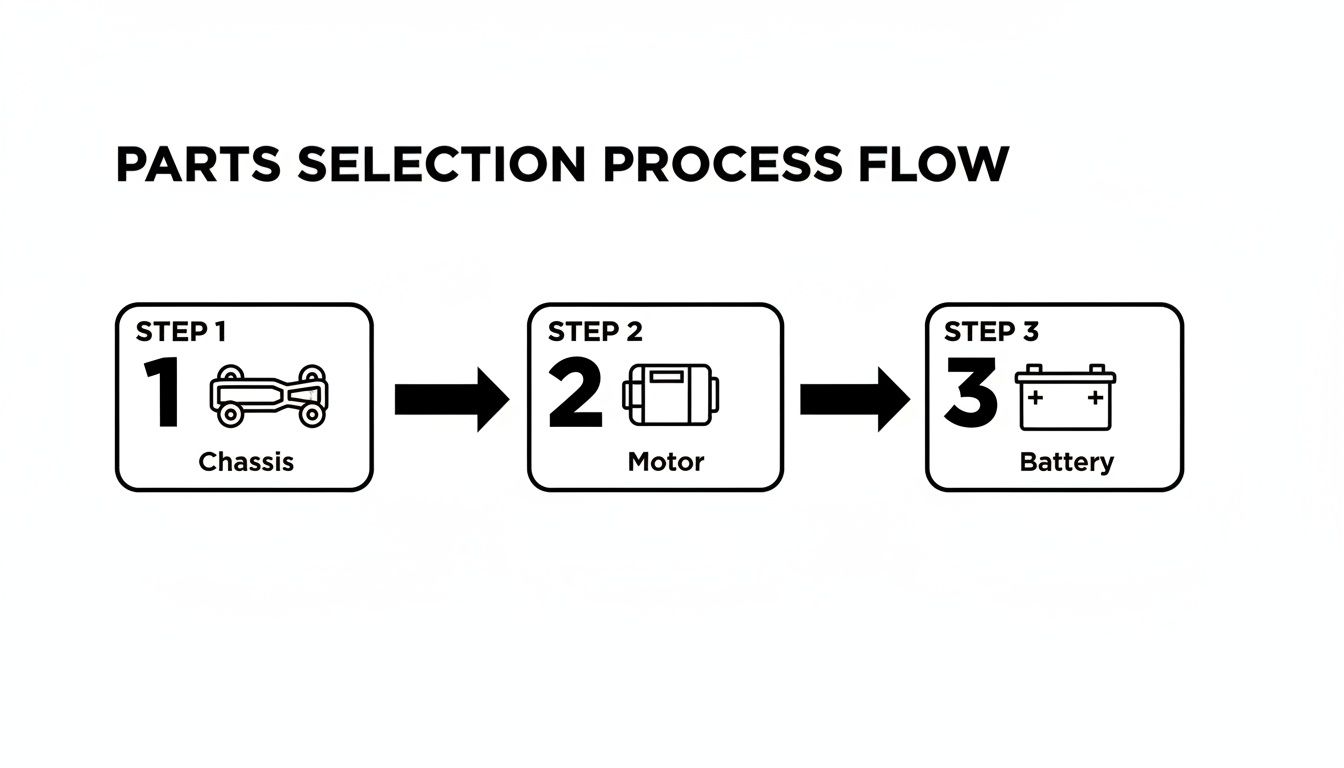
This flow highlights how a solid chassis choice leads to adaptable motor mounts and simplifies battery tray routing.
Suspension And Steering Linkages
Tuning your suspension arms and shock towers pays dividends in corner predictability. I lock down M3 screws at 1.5 Nm, then focus on parallel arm alignment to avoid wild camber changes.
• Under load, check arm heights with a simple block—unevenness here means erratic cornering.
• Tighten hinge pins until they spin freely but show zero slop.
• Mark linkages before each tweak; you’ll thank yourself when logging setup changes.
• A 45 mm ruler is all I need for quick toe-in checks.
Solid torque here brings crisp steering feedback and eliminates unwanted bind.
For guaranteed accuracy in every M3 and M4 fitment, explore our calibrated torque wrench guide at digital-rc.
Final Fitment And Binding Checks
Before you plug in any electronics, rotate everything by hand. That quick dry run catches binding before it bites.
• Listen closely for rubbing or clicks near bulkheads.
• Rock the chassis side-to-side to spot hidden bind.
• Inspect gear mesh under light—metal dust is a red flag.
• Make sure suspension returns to neutral on its own.
Run through these checks once, and you’ll head to the track worry-free.
Next, you’ll wire in electronics and tune for baseline performance in the following section.
Set Up Electronics And Tune For Baseline Performance
Tidy wiring does more than look good; it cuts the risk of shorts and helps your chassis stay balanced. Planning cable runs now saves frustration once you power up.
- Braided sleeving on ESC leads (Braided Sleeving) and heat-shrink on motor plugs (Heat-Shrink Tubing Kit) reinforce stress points.
- Route wires along the chassis centreline to even out weight and avoid snagged cables.
- Use low-profile hook-and-loop straps (Hook-and-Loop Straps) to keep bundles tight under heavy cornering.
- Position the receiver module away from power lines—less radio noise, more reliable steering.
- Balance motor leads on one side and sensor wires on the opposite to fine-tune handling.
Radio Calibration
Getting your transmitter endpoints nailed down delivers crisp throttle response and predictable braking.
- Throttle endpoint at 100% with brake throw near 50% for controlled power delivery.
- Introduce 5% throttle expo and 30% brake expo to soften input around neutral.
- Tweak dual rates if you prefer a gentler top-end or sharper stopping power.
Most ESCs let you adjust timing and punch via a programming card—grab one of our ESC Programming Cards. Follow the manufacturer’s steps for parameter changes, then verify everything on your first test run.
| ESC Parameter | Recommended Value |
|---|---|
| Timing | 6° |
| Brake Strength | 75% |
| Brake Punch | 30% |
Baseline Suspension And Camber Settings
Starting with the right shock oil and camber makes a huge difference on varied surfaces.
| Surface | Front Oil | Rear Spring Rate | Negative Camber |
|---|---|---|---|
| Asphalt | 30wt | Medium | 1.5° |
| Carpet | 35wt | Soft | 1.7° |
Negative camber at 1.5° front and rear on asphalt gives solid corner-entry grip. If you sense understeer, dial in another 0.2° or add a 1mm shim to each spring perch.
Interpreting Race Data Logs
Your telemetry is a goldmine for tuning before things go sideways. Review logs after every run to spot:
- Voltage drop below 6.8V, a sign your pack is nearing the end of its punch.
- Current spikes over 40A, which may call for softer timing or a lower gear ratio.
- Temperature climbs past 80 °C, triggering the need for extra fan speed or reduced punch.
Quick log audits reduce pit adjustments by 30% and catch faults early on.
Use this feedback to rebalance timing, gearing and brake strength for consistent lap times.
Quick Tips And Best Practices
- Zip-tie wires under the battery tray and choose low-profile mounts to avoid snags.
- Inspect heat-shrink and braided sleeving at the start of each season.
- Recalibrate transmitter endpoints whenever battery age or ambient temperature changes.
- Mount the receiver antenna at a 45° angle to minimise dropouts in sweeping turns.
- Check connector crimps and solder joints to prevent voltage loss under load.
- Apply thread-lock to all electronics-mount screws to resist vibration.
- Store your ESC programming card in its case to protect the contacts.
- Clean connectors regularly with electronics cleaner for reliable data links.
You might be interested in our ESC selection guide on matching your electronic speed controller to your motor.
At one club race, I dropped timing from 8° to 6° and saw motor temps fall by 5 °C, which shaved 0.3 s per lap on my 1/10 touring track.
On our indoor carpet circuit, swapping to 30wt rear oil improved turn-in feel, while on asphalt a stiffer rear spring tamed body roll and boosted stability. Real-time telemetry also caught a voltage sag when punch exceeded 40%, so I added a 30 mm fan above the ESC—just secure those fan leads away from sensor wires to avoid interference.
Before your next outing, check for firmware updates on your ESC and transmitter, use a LiPo Safe Bag for battery care, and consider an external Telemetry Buzzer for instant alerts. Verify your servo travel limits to prevent binding at full lock, and rotate your tyres off-car while monitoring voltage to test battery sag under real load.
Happy testing.
Avoid Pitfalls And Maintain Your RC Car Kit
Even with careful planning, 1/10 and 1/12 racers still hit unexpected snags at the track. Stripped threads, over-torqued shock caps and loose pinion set screws have all sidelined me mid-heat. I’ve lost finals when a misaligned battery tray jammed under acceleration.
A few quick checks can keep you on pace:
- Torque shocks with a calibrated wrench, matching the spec in your manual
- Paint-dot each screw head to spot any backing out under load
- Double-check ESC plug polarity before locking everything down
“Preventative checks today save race breaks tomorrow.”
Maintenance Schedule
I slot these tasks into my routine so I never miss a beat:
| Task | Frequency |
|---|---|
| Suspension rebuild | 5 rides |
| Diff fluid check | Monthly |
| Drivetrain lube | 10 battery cycles |
Winter, especially January–February, drives a 150% spike in upgrade parts—find the full report at Cognitive Market Research.
Consider upgrading to:
- Steel dogbones that resist bending under power
- Aluminium shock pistons for chatter-free damping
- Sealed bearings to cut friction by 30%
- Graphite chassis braces for added rigidity without the weight
When To Upgrade Components
Address weak spots before they fail on race day:
- Steel dogbones stand up to hard corner exits
- Aluminium shock pistons smooth out intense damping
- Sealed bearings spin freely even after long runs
- Graphite chassis braces stiffen the platform with minimal grams
Jot every service and upgrade in a log, and snap pre-teardown photos. You’ll thank yourself when reassembling under the clock.
Frequently Asked Questions
Every RC builder hits the same questions: motor selection, camber angles, service intervals and kit choices. Here’s a handy reference to keep your 1/10 and 1/12 builds on point.
-
What Motor Is Best For A 1/12 Build RC Car Kit?
A high-torque brushless unit in the 3000–3500KV bracket balances punchy acceleration with manageable heat on those nimble chassis. -
How Do I Set Correct Wheel Camber?
On asphalt, start at 1.5° negative camber front and rear. Then dial in 0.2° increments—more negative if the car understeers, flatter if it oversteers.
Battery And Drivetrain Care
Keeping your drivetrain slick and batteries healthy is the secret to consistent lap times.
-
Re-lube Frequency
Fresh grease every 8–10 battery cycles or right before race day prevents premature wear. -
Are Brushless Kits Worth It For Beginners?
Absolutely. Modern brushless systems are virtually plug-and-play and outperform old brushed setups in both efficiency and reliability.
Pro Tip: A tiny 0.2° tweak in camber can unlock grip you didn’t know was there—no major upgrades required.
Build Kit Tips
- After your first shakedown, inspect gear mesh closely. Too tight and you’ll hear noise; too loose and teeth get chewed up.
- Label each parts bag by assembly stage—it cuts search time the next time you tear down.
- Keep extra M3 screws and a handful of bearings in your toolbox for on-the-fly fixes.
- Verify battery balance leads before every run to avoid sudden voltage sag.
- Stroll around the pits with your rig to confirm radio range—nothing kills a heat faster than a drop-out.
These pointers will trim hours off your build and sidestep common slip-ups. Dive deeper into our 1/10 and 1/12 kits and accessories at digital-rc.
Ready to get started? Shop complete 1/10 and 1/12 kits at digital-rc: https://digitalrc.ca