
A Complete Guide to RC Bodies 1/10 Scale
More than just a shell, your RC body is the heart of your car's identity and a critical piece of its performance puzzle. The right rc bodies 1/10 scale shell affects everything from on-track handling to overall durability. This guide will help you make the right choice for your next build.
Your Guide to 1/10 Scale RC Bodies
Welcome to the world of 1/10 scale RC customization. An RC car body is so much more than a simple plastic cover—it defines your vehicle's look and directly influences how it behaves on the track or trail. Think of this guide as your complete roadmap, walking you through every crucial part of picking, prepping, and maintaining the perfect shell.
We'll take you through the entire process, making sure you have the knowledge to kick off your next project with total confidence. Whether you're building a hyper-realistic scale crawler or an aerodynamically-tuned touring car, nailing these fundamentals is key. Our goal is to help you find the ideal body from our hand-picked selection here at Digital RC.
What This Guide Covers
We’re going to build your expertise from the ground up, covering a few key areas:
- Body Types and Materials: We'll dive into the differences between flexible polycarbonate shells and rigid ABS hard bodies, and when to use each.
- Fitment and Mounting: You'll learn how to measure wheelbase and width to get that perfect, professional-looking fit every time.
- Performance Effects: This is where we explore how aerodynamics, downforce, and drag actually impact your car's handling on the track.
- Customization: We'll share tips for trimming, painting, and applying decals to get a flawless, head-turning finish.
The RC hobby is a serious passion for a lot of people. In a place like Canada, the demand for quality 1/10-scale bodies alone is massive. Whether you're a weekend basher or a serious competitive racer, finding the right shell is a key part of the experience. That really shows you how dedicated hobbyists are.
For racers and builders pushing the limits of design, modern tools have opened up a new world of possibilities. If you're dreaming up a completely custom body or just want to tweak an existing one, there's a ton of great free 3D modeling software out there that can bring your ideas to life before you even touch a sheet of polycarbonate.
Choosing Your Canvas: Polycarbonate vs. ABS Hard Bodies
When you're picking out a new shell from the massive world of 1/10 scale RC bodies, your first big choice is the material. It really boils down to two options: flexible polycarbonate or rigid ABS plastic. This decision shapes not just how your car looks, but how it takes a hit and handles on the track.
Think of it this way: a polycarbonate body is like high-performance athletic gear, while an ABS body is more like a finely tailored suit. Both have their place, but they're built for completely different jobs.
Polycarbonate, often sold under the brand name Lexan, is the undisputed champion for racing and bashing. It's incredibly light and flexible, designed to absorb brutal impacts from high-speed crashes and tumbles without shattering. If durability is your top priority, this is your material.
On the other hand, an ABS hard body is all about realism. It's like a detailed scale model kit you can actually drive, offering sharp, moulded details like grilles, mirrors, and light buckets that softer polycarbonate just can't match. This makes ABS the go-to for scale crawlers and stunning shelf-queens where authentic looks are everything.
The Performance Trade-Off
The real difference between these materials comes down to how they handle stress. Polycarbonate is designed to flex on impact and pop right back into shape, shrugging off hits that would crack a more rigid plastic. Its feather-light weight also helps keep the car's centre of gravity low—a massive advantage in on-road racing for improving cornering speed and stability.
ABS bodies are heavier and much more rigid, which can raise the car's centre of gravity and make it more likely to roll over in high-grip situations. Because they don't flex, a hard crash is more likely to cause a crack or a clean break instead of just a dent. For a scale builder, though, that rigidity is exactly what you want to hold those true-to-life shapes perfectly.
Here's a key difference you'll discover in the workshop: you paint clear polycarbonate shells from the inside. This genius technique protects your custom paint job from scratches and scuffs, keeping it looking fresh even after a rough day at the track. ABS bodies, however, are painted on the outside just like a real car, opening the door for cool weathering effects and a more authentic finish.
Polycarbonate vs. ABS Body Comparison
To make the choice even clearer, let's put these two materials head-to-head. Seeing the core differences side-by-side will help you match the right material to your specific RC goals, whether you're chasing lap times on the carpet or climbing over rocks on a trail.
| Characteristic | Polycarbonate (Lexan) Body | ABS Hard Body |
|---|---|---|
| Durability | High impact resistance; flexible | Rigid; can crack or break on impact |
| Weight | Very lightweight | Heavier, which can affect handling |
| Realism | Good, but details are softer | Excellent, with sharp, moulded details |
| Best For | Racing, bashing, high-performance use | Scale crawlers, show models, realism builds |
| Painting | Painted on the inside for protection | Painted on the outside for realism |
This decision isn't just about performance; it's also about budget. Looking at retailers across Canada, there’s a clear price difference. Standard clear polycarbonate touring car bodies usually run between $40 and $120. In contrast, highly detailed ABS hard bodies start higher, typically from $90 to $220, with some of the premium licensed kits easily costing more. You can browse a huge range of these premium RC body options here to get a feel for the market.
Ultimately, it all comes back to your goal. For the competitive on-road racing world that we live and breathe here at Digital RC, polycarbonate is the only way to go. Its killer combination of low weight, aerodynamic potential, and rugged durability makes it the perfect canvas for a winning race car.
Achieving a Perfect Fit: Wheelbase, Width, and Mounting
A killer paint job is only half the story. If your new rc bodies 1/10 scale shell doesn't sit right on your chassis, it can ruin both the look and the handling of your car. Getting the fit right is a game of millimetres, but it's what separates a professional build from an amateur one.
Proper fitment prevents that ugly tire rub that destroys a fresh paint job during hard cornering. More importantly, it ensures the body is positioned correctly for predictable handling. Let's break down the two critical measurements you need to nail: wheelbase and track width.
Mastering the Core Measurements
Understanding these two dimensions is the foundation of a clean, functional build. Most manufacturers we carry, like Pandora RC, provide detailed specs for their bodies, which makes it much easier to match them to your chassis.
-
Wheelbase: This is simply the distance from the centre of your front axle to the centre of your rear axle. For most 1/10 scale touring cars, this is fairly standard, usually falling between 257mm and 260mm. Still, always measure your chassis first to be certain.
-
Track Width: This measures the distance between the outside edges of your tires on the same axle. Body manufacturers list a width—like 190mm or 200mm—that your car's track width needs to fit inside. You can fine-tune this with different wheel offsets to perfectly fill out the wheel arches for that flush look.
A common mistake is assuming all "1/10 scale" bodies are the same. A 190mm touring car body just won't fit a 200mm chassis without looking awkward and causing serious tire rub. Always double-check the body specs on our product pages against your chassis measurements before you buy.
Choosing Your Mounting System
Once you've confirmed the body's dimensions will work, the next step is figuring out how to attach it. The system you choose affects not just the final look but also how secure the body is during a race.
Traditional Body Posts
This is the classic, time-tested method. Plastic posts stick up from the chassis, and you drill holes in the body to secure it with clips.
- Pros: It's lightweight, offers easy body height adjustment, and is by far the most secure option. For high-speed racing where a loose body means a DNF, this is the most reliable choice.
- Cons: You have to drill holes in your freshly painted shell, which can be nerve-wracking. The visible posts and clips also take away from a true-to-scale appearance.
Magnetic Mounts
For those chasing a clean, "stealth" look, magnetic mounts are a fantastic alternative. These systems use powerful magnets—one set glued inside the body, the other attached to the chassis—to hold everything in place.
- Pros: They create a flawless, seamless look with no visible posts or clips. This is the go-to for show cars or any build where scale realism is the top priority.
- Cons: They just aren't as secure as posts. A hard knock on the track can dislodge the body, making them less suitable for the rough and tumble of competitive racing.
This visual guide breaks down the core material choices that often come before you even think about fitment.
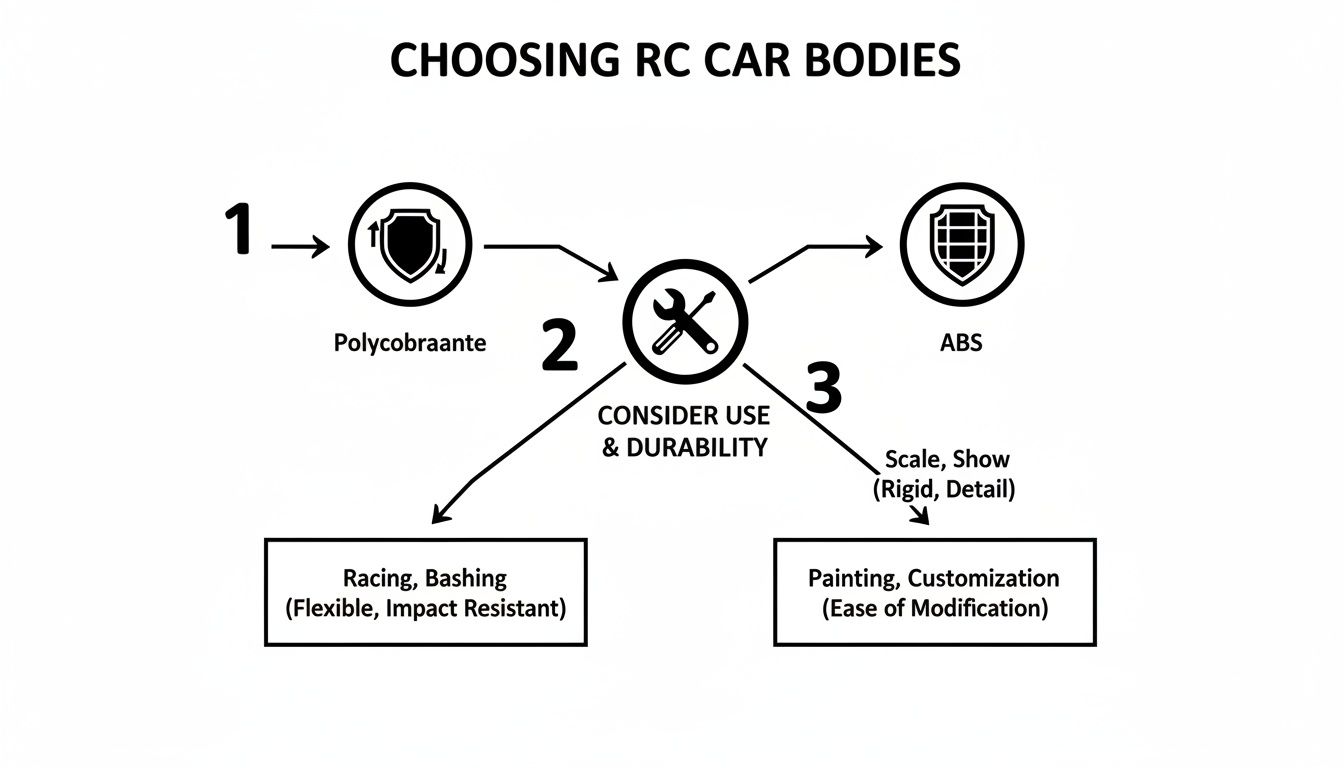
As the flowchart shows, the first decision is often between flexible polycarbonate for on-track performance and rigid ABS for ultimate scale realism.
Step-by-Step Guide to a Flawless Mount
Want to avoid the common fitment headaches? Follow this simple process.
- Measure Your Chassis: Before you do anything else, get an accurate measurement of your wheelbase and track width.
- Select a Compatible Body: Check the specs on the product page to make sure the body's dimensions are a match for your chassis.
- Perform a Test Fit: Place the uncut, clear body over your chassis to see where the wheel wells will line up. Use a marker on the outside protective film to mark your axle locations.
- Drill Mounting Holes (for Posts): For post mounts, carefully lower the body onto the posts and mark the centre of each one from the inside. Start with a small pilot hole, then gradually enlarge it with a body reamer for a perfect, snug fit. A small dab of Shoe Goo or a body washer around the hole can prevent cracks from forming later.
- Secure and Align: Mount the body and check for tire clearance through the full range of suspension travel and steering lock. Use the post clips to adjust the body height until you've eliminated any rubbing.
By taking a methodical approach to measuring and mounting, you guarantee your rc bodies 1/10 scale project will not only look professional but perform flawlessly on the track.
Bringing Your Vision to Life with Paint and Prep
This is where the magic happens. Turning a clear, flimsy piece of polycarbonate into a custom-painted work of art is easily one of the most rewarding parts of any RC build. A great paint job gives your rc bodies 1/10 scale shell a unique personality that makes it your car on the track.
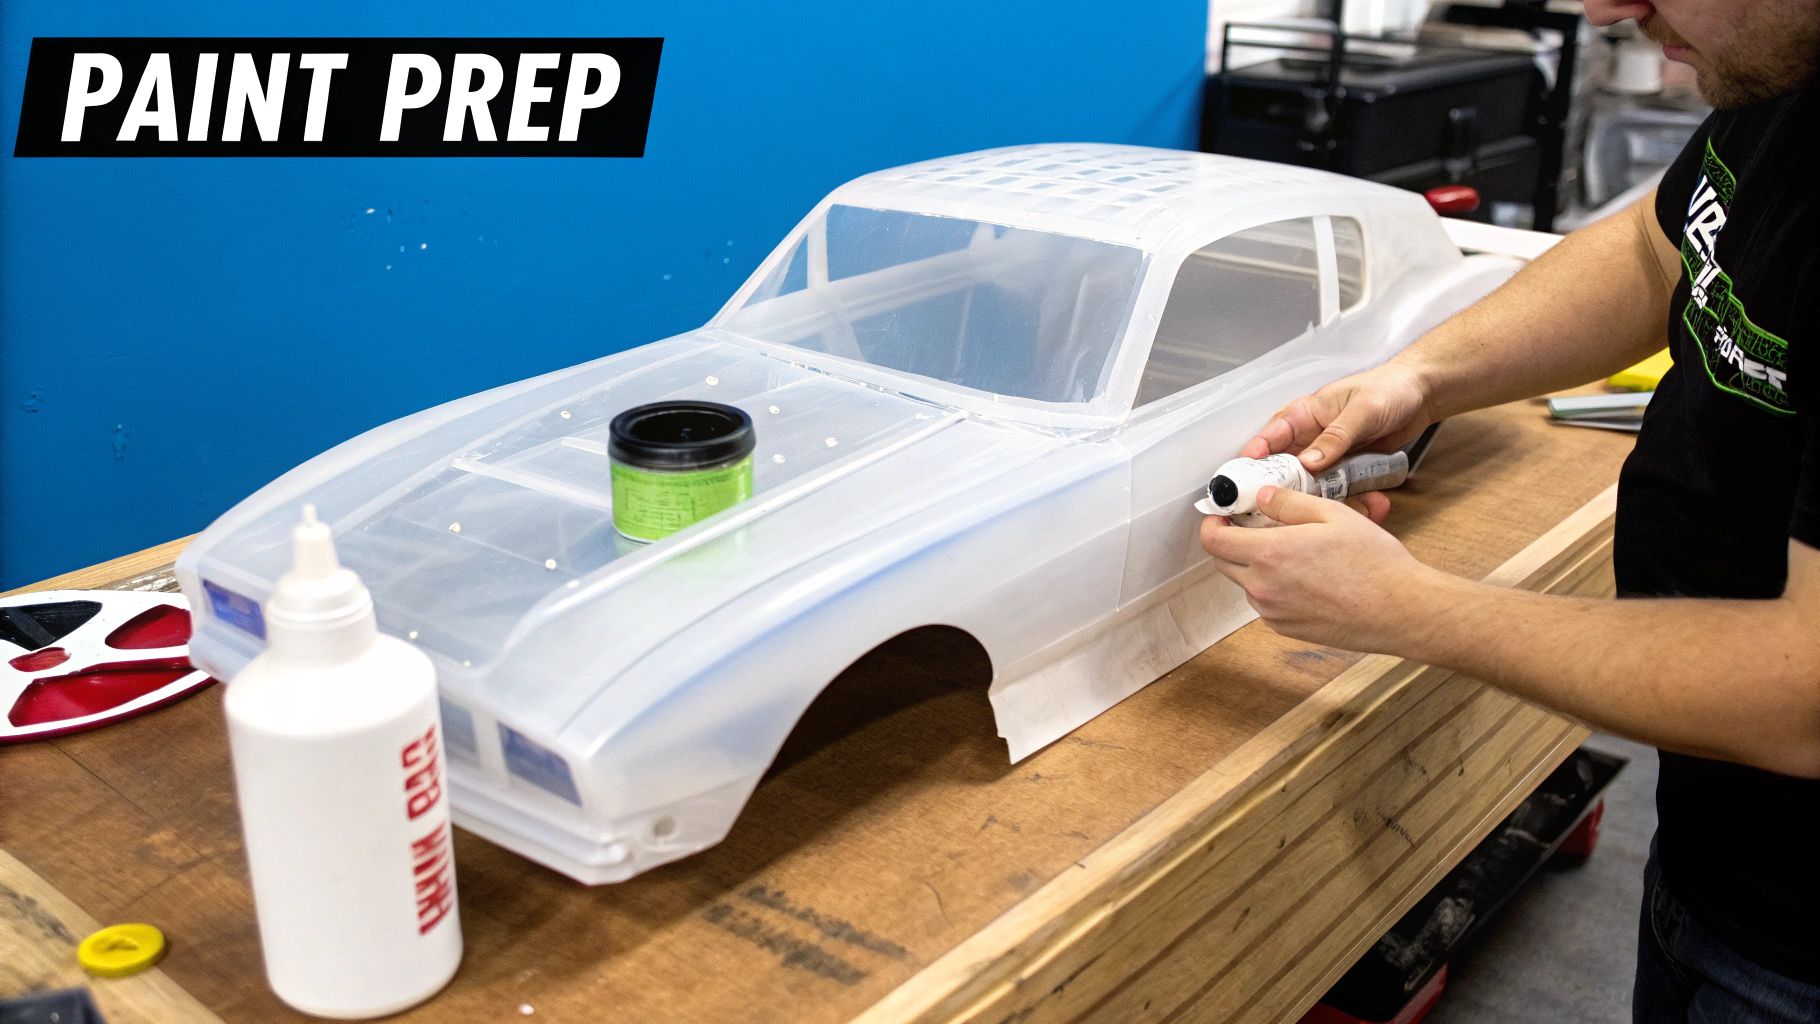
But getting that professional, glass-smooth finish takes a bit of patience and a specific process. Unlike a static model kit, you paint polycarbonate bodies from the inside out. This protects the finish from scrapes and scuffs, but it also means you have to think in reverse. Don't worry, we'll walk you through it.
The Foundation of a Flawless Finish
Before you even think about cracking open a can of paint, proper prep is non-negotiable. Rushing this stage is the number one cause of paint flaking, bleeding, and other ugly finishes. Think of it like priming a wall before painting—it's the work nobody sees that guarantees a great result.
First thing's first: wash the inside of the body with warm water and a bit of dish soap. New shells have a thin layer of mould-release agent on them from the factory. If you don't get it all off, your paint won't stick. Period. Rinse it well and let it air dry completely or use a lint-free cloth.
Next, apply the window masks. These are just pre-cut vinyl stickers that cover the areas you want to keep clear, like the windshield and side windows. Stick them on the inside of the shell, making sure to press the edges down firmly. This is crucial for preventing paint from seeping underneath.
Scoring, Trimming, and Painting Essentials
With the body clean and masked, it's time to get down to business. This is where precision and patience really pay off.
1. Scoring the Trim Lines It’s usually easier to score the cut lines for the wheel wells and body edges before painting. Use a sharp hobby knife to lightly trace the faint guide lines moulded into the shell. You're not trying to cut through it, just creating a clean line that will make the final trim much easier after the paint is dry.
2. Choosing the Right Paint This is critical: you must use polycarbonate-specific paint. Regular model paints will crack and flake off the first time your car takes a tumble because they aren't formulated to flex. Polycarbonate paints are designed to bite into the plastic and stay flexible, protecting your hard work.
3. Painting in Reverse Remember, you're painting the inside. This means the first colour you spray is the detail layer you see from the outside. You have to layer your colours from darkest to lightest.
- Start with any black details, like trim or shadow lines.
- Next, lay down your main, darker colours.
- Follow up with any lighter colours.
- Finally, apply a "backing" colour—usually white or silver—over everything. This last coat is what makes the other colours pop and keeps them from looking transparent.
A common rookie mistake is laying down coats too heavily. It’s much better to spray several thin, light coats, letting each one dry for 10-15 minutes. This prevents runs and that dreaded "orange peel" texture.
Troubleshooting Common Painting Problems
Even the most careful painter runs into issues sometimes. Knowing how to spot and fix them can save a paint job. A quality shell like the Team C Wolf Max 1/10 Touring Car Body gives you a perfect canvas to practice these techniques.
Here’s how to deal with a few common frustrations:
- Paint Bleeding: This happens when paint gets under your masking tape. It's almost always caused by not pressing the edges down firmly enough or by spraying coats that are too wet and heavy.
- Fuzzy Edges: If the lines between your colours aren't crisp and sharp, it's likely from overspray. This can happen if you hold the can too far from the body or use cheap masking tape that doesn't seal well.
- Orange Peel Texture: A bumpy, uneven finish is a dead giveaway that the paint was applied too heavily or in humid/cold conditions. Stick to light, even coats for that smooth-as-glass look.
Follow these steps, and you can turn any clear rc bodies 1/10 scale shell into a custom piece that not only looks incredible but is also tough enough for the track.
How Body Style Shapes Performance and Handling
An RC body is so much more than a cosmetic shell—it's one of the most powerful aerodynamic tools you have to dictate how your car behaves on the track. Every curve, vent, and wing angle on modern rc bodies 1/10 scale is carefully engineered to manipulate airflow. This is what generates the forces that can either plant your car to the track for insane grip or let it slice through the air with almost zero resistance.

Think of a high-downforce touring car body like an upside-down airplane wing. Instead of creating lift, it generates a powerful downward force that literally pushes the tires into the racing surface. This invisible pressure is the secret to carrying more speed through the corners and keeping the car stable when you're flat-out on the main straight.
The Balance Between Downforce and Drag
In RC racing, finding the perfect setup is a constant balancing act between two key aerodynamic forces: downforce and drag. Understanding how your body choice tips this balance is fundamental to shaving precious tenths off your lap times.
-
Downforce is that vertical force pressing your car onto the track. A body with an aggressive front splitter, a steep windscreen angle, and a big rear wing is built to generate heaps of it. This translates directly into more mechanical grip, especially in high-speed corners.
-
Drag is the resistance the body creates as it punches a hole through the air. A sleek, low-profile body with smooth, flowing lines is designed for low drag, letting it hit higher top speeds on long straights.
The trade-off is pretty straightforward: high-downforce bodies create more drag, which can scrub off top speed. On the flip side, slippery low-drag bodies offer less cornering grip. The perfect body for any given track is the one that finds the sweet spot between these two forces.
The following table breaks down how specific design elements impact your car's on-track feel.
Aerodynamic Effects of Different Body Styles
| Body Feature | Aerodynamic Effect | Best Use Case |
|---|---|---|
| Aggressive Front Splitter | Increases front-end downforce, improves turn-in | Tight, technical tracks requiring sharp steering |
| Large Rear Wing | Adds significant rear downforce and stability | High-speed tracks; helps prevent spinning on exit |
| Steep Windscreen Angle | Generates overall downforce over the entire car | High-grip surfaces where maximum traction is needed |
| Low, Sleek Profile | Reduces overall drag for higher top speeds | Large, flowing tracks with long straights |
| Vents and Cutouts | Manages airflow and can reduce high-speed lift | High-speed oval or large-track touring car racing |
| Cab-Forward Design | Shifts aerodynamic pressure forward for steering | High-grip carpet or asphalt where more steering is desired |
Ultimately, choosing the right combination of these features allows you to tailor your car's handling to a specific layout, giving you a real competitive edge.
How Different Body Shapes Affect Handling
The overall shape of your rc bodies 1/10 scale shell will completely change your car's handling characteristics. An aggressive, high-downforce design makes the car feel incredibly planted and responsive, letting you drive harder into corners without the rear end stepping out. These are your go-to bodies for tight, technical tracks where corner speed is everything.
In contrast, a sleek, low-drag body is the weapon of choice for big, flowing tracks with long straights. The reduced air resistance means your motor doesn't have to work as hard to hit its maximum RPM, giving you a crucial advantage in a drag race to the finish line. These bodies often feel a bit "looser" in the corners but absolutely fly in a straight line.
The secret to a winning setup often lies in achieving the right aerodynamic balance from front to rear. A body that generates too much front downforce can make the rear end feel unstable, while too much rear downforce can cause understeer, making the car push wide in turns.
Fine-Tuning with Wings and Add-Ons
Your ability to tune aerodynamics doesn't stop with just swapping the body. Wings, gurneys, and splitters are your tools for making small but critical adjustments to the car's handling right at the track.
An adjustable rear wing is your main tool for tuning rear grip. Increasing the wing's angle creates more downforce, planting the rear tires for better traction when you get on the power. Flattening the wing reduces both downforce and drag, freeing up the car for more top speed. Some bodies are designed as part of a complete aero package, which you can see in our deep dive on a high-performance shell like the ZooRacing Hyrax LMH 1/10 Body Shell. This is where you turn your body from a simple cover into a real strategic advantage, perfectly adapting your car's performance to the demands of any track layout.
Protecting Your Work: Repairs and Maintenance
Your custom-painted rc bodies 1/10 scale shell is more than just a cover; it's a work of art that takes a beating. High-speed impacts, sketchy landings, and even the constant pressure from body posts will eventually lead to cracks and scuffs. It's just part of the game.
But learning how to properly repair and maintain your body doesn’t just save you money. It keeps your car looking sharp and race-ready, protecting the time and effort you invested in that paint job.
Reinforcing High-Stress Areas
The best defence is a good offence. Before your body even hits the track, reinforcing its weakest points can stop damage before it even starts. The areas around the body post holes and the thin, flimsy edges of wheel arches are almost always the first to crack under pressure.
One of the most effective tricks is to apply a specialized adhesive to these zones from the inside. This creates a flexible buffer that soaks up impact energy and spreads the load from body clips, stopping those tiny stress fractures from ever forming.
Think of it like adding a flexible skeleton to your body's most vulnerable spots. A thin, even layer of reinforcing glue adds real structural integrity without packing on weight—which is critical for keeping a low centre of gravity in competitive touring cars.
Repairing Cracks and Splits
Even with the best prep, crashes happen. When a crack does appear, you need to jump on it immediately to keep it from spreading across an entire panel. A go-to technique is using a combo of specialized glue and some kind of reinforcing material.
For small cracks, a simple dab of Lexan-safe adhesive can often fuse the plastic right back together. Bigger splits or holes? That's when you need a more robust approach. A classic method is to bridge the gap with drywall tape and then seal it all up with a strong, flexible adhesive like Shoe Goo.
For a cleaner, purpose-built solution, you can get complete kits made just for this. The ORCA Lexan Body Reinforce & Repair Glue is a professional-grade option that creates an incredibly strong, clean bond specifically for polycarbonate.
Essential Maintenance Habits
Keeping your body in top condition is about more than just fixing damage. A few simple habits will go a long way in preserving your paint and protecting the finish.
- Clean It Right: After a race day, wipe down the inside and outside of the shell with a gentle cleaner and a microfibre cloth. Stay away from harsh chemicals that can cloud the polycarbonate or eat away at your paint.
- Stop Scuffs: Apply clear protective film or "chassis tape" to the inside areas where your tires might rub during full suspension compression. This stops the paint from getting worn away from the inside out.
- Store It Safely: Don't just toss your body in your pit bag where it can get crushed or bent. A dedicated body bag or simply hanging it up will prevent warping and keep its shape intact.
These simple habits will keep your rc bodies 1/10 scale creation looking its best for a whole lot longer.
Your 1/10 Scale RC Body Questions Answered
Diving into the world of 1/10 scale RC bodies always brings up a few questions, especially when you’re chasing that perfect fit or a showroom-quality paint job. We get these questions all the time, so let's clear up some of the most common ones to help you get your next build right.
Fitment and Compatibility Questions
How do I know if a body will fit my chassis? It all comes down to two key numbers: wheelbase and width. Grab a ruler and measure your chassis from the centre of the front axle to the centre of the rear axle—that’s your wheelbase. For most touring cars, you're looking for something around 257-260mm.
Next, measure the width from the outside of your front tires. Compare those two numbers to the specs on our product pages. If they match up, you've got a winner.
Can I use a 200mm body on a 190mm chassis? You can, but it takes a bit of work to make it look right. The main issue is that your wheels will be tucked way inside the wheel wells, which looks awkward and narrows your track width, potentially messing with handling.
The fix is to use wheels with a larger offset. This pushes them further out, filling the arches properly and restoring your track width for predictable performance.
Painting and Preparation Questions
What kind of paint should I use on a polycarbonate body? This one is non-negotiable: you have to use paint made specifically for polycarbonate, often sold as "Lexan" paint. This type of paint is chemically formulated to bite into the plastic and flex with it. If you use standard model paint, it will crack and flake off the first time you have a minor crash.
Why did my paint job come out blotchy or with "orange peel"? This almost always happens from laying the paint on too thick or spraying in the wrong conditions, like when it's too cold or humid. The secret to a glass-smooth finish is patience. Spray several light, even coats from about 20-25 cm away. Give each coat 10-15 minutes to dry before you even think about adding the next one.
A critical rule for polycarbonate shells is to always paint in reverse: lay down your darkest colours and fine details first, followed by lighter colours, and finish with a solid backing coat of white or silver. This final layer makes your primary colours vibrant and opaque.
How do I prevent paint from bleeding under my masks? For crisp, clean lines, the prep work is everything. Make sure you press down the edges of your window masks and any liquid mask you’re using, especially in the corners.
When you're ready to spray, your first coat along any masked edge should be an extremely light "dusting." This tiny layer of paint seals the edge of the mask and stops the heavier coats that follow from seeping underneath.
At Digital RC, we stock a curated selection of high-performance 1/10 scale RC bodies and all the accessories you need to achieve a professional result. Find the perfect shell for your touring car and get it delivered fast.
Browse our complete collection of 1/10 scale bodies and accessories at digitalrc.ca