
A Complete Guide to RC Car Bodies
An RC car body is the shell that mounts onto your vehicle's chassis, but it's so much more than that. A well-chosen body from our collection can dramatically improve handling, protect your sensitive electronics, and give your car a unique identity on the track. It’s the key to both performance and personalization.
Why Your RC Car Body Is More Than Just a Shell

Your RC car’s body is its identity. It’s the first thing people notice, but it’s far more than a simple accessory; it's a critical component that defines your vehicle’s style, durability, and even its on-track performance. Think of it as the skin and the uniform for your high-speed machine.
This guide is your starting point for transforming any RC car, from a standard ready-to-run (RTR) kit to a custom-built competitive racer. We’ll show you how selecting the right body directly impacts aerodynamics and handling, and we’ll walk you through everything from understanding materials to mastering a pro-level paint job.
The Foundation of Performance and Style
Every choice you make with rc car bodies influences how your car behaves. A sleek, low-profile touring car body will slice through the air differently than a high-downforce design meant for tight, technical tracks. The material it's made from determines how it stands up to the inevitable bumps and scrapes of racing.
For the competitive racer, the body is an essential tuning component. Swapping from one body to another can be just as impactful as changing your suspension setup, offering a way to fine-tune your car’s balance and grip for different track conditions.
This guide provides a roadmap to selecting, personalizing, and maintaining the perfect body from our curated collection. Our goal is to help you match a body to your specific driving style and chassis, ensuring you get the most out of your on-road racer.
What This Guide Covers
We've broken down the entire process into manageable steps, giving you the confidence to tackle your next project. You’ll learn about:
- Materials and Types: Discover why polycarbonate is the industry standard and how to choose between different body styles like high-downforce or low-drag options for your 1/10 touring car.
- Perfect Fitment: Learn how to measure your chassis, trim wheel wells, and drill mounting holes for a clean, professional installation that avoids tire rub.
- Custom Painting: Master the techniques for creating a one-of-a-kind look, from masking intricate designs to applying paint for a durable, glossy finish.
- Performance Tuning: Understand how wings, splitters, and overall body shape affect downforce, traction, and high-speed stability.
By the end, you'll see your RC car body not just as a shell, but as a key piece of performance equipment.
Choosing the Right Material and Body Type
Not all RC car bodies are built the same. The material they’re made from is the single biggest factor in how they perform and how long they last. When you look through our selection, you'll see one material that completely dominates competitive on-road racing: polycarbonate.
Polycarbonate, which you’ll often hear called by its brand name, Lexan, is the undisputed king of RC car bodies. Why? It hits that perfect sweet spot between strength and flexibility. Think of it like a boxer who can take a punch and just spring right back. This quality means it can handle high-speed hits, accidental taps on the wall, and the general abuse of a race weekend without shattering.
That resilience is absolutely critical for protecting the expensive electronics packed inside your chassis. A good polycarbonate body is like a shield, absorbing and spreading out the force from an impact that would otherwise wreck your motor, ESC, or battery.
Polycarbonate Versus Other Plastics
While polycarbonate is the top choice, it helps to know why it’s better than other plastics like ABS (Acrylonitrile Butadiene Styrene). ABS plastic is much harder and more rigid. You'll usually see it on highly detailed scale models or some ready-to-run bashers where getting every little realistic detail right is more important than track performance.
The trade-off is durability. An ABS body might have sharper, more realistic molded details, but that same rigidity makes it brittle. A small crash that would just scuff a polycarbonate shell could easily crack or even shatter a hard plastic body.
For serious racing, especially in 1/10 touring and 1/12 pan car classes, the choice is a no-brainer. Polycarbonate gives you the impact resistance you need to finish the race, while harder plastics are just an unnecessary risk for a DNF (Did Not Finish).
Here’s a quick rundown of the differences:
- Polycarbonate (Lexan): Extremely durable, flexible, and lightweight. It's also painted from the inside, which is a huge plus because it protects your awesome paint job from scratches and scuffs. This is the standard for all high-performance rc car bodies.
- ABS Plastic: Gives you incredible scale detail and rigidity. The downside is that it's heavier and much more likely to crack on impact, making it a poor choice for the competitive racing scene.
This is exactly why our entire collection focuses on providing the best quality polycarbonate bodies, engineered specifically for the demands of on-road racing.
Matching the Body Type to Your Driving Purpose
Beyond the material, the actual shape and design of the body have a massive impact on your car's handling. Different designs are engineered for specific track conditions and driving styles.
A high-downforce body, for example, will have aggressive wings, splitters, and sculpted channels. These features are all designed to push the car firmly onto the track, creating huge amounts of grip in the corners. They're perfect for tight, technical circuits where your cornering speed is everything.
On the other hand, a low-drag or high-speed body has a much sleeker, smoother profile. Its main job is to slice through the air with as little resistance as possible, which maximizes your speed on the straights. These are the go-to choice for big, flowing tracks with long straights where top speed is what gets you the win. If you want to see options built for competition, you can check out our curated selection of high-performance touring car bodies.
Whether you need an aggressive, race-proven shell built for pure speed or a high-downforce design for technical tracks, understanding these differences is the first step. It ensures you pick a body that not only looks great but also helps your car perform exactly how you need it to.
How to Achieve Perfect Fitment on Your Chassis
Getting a new RC car body to sit perfectly on your chassis can feel like a dark art, but it's actually a straightforward process once you know what you're doing. Nailing the fitment isn't just about looks—it's critical for preventing performance issues like tire rub during hard cornering. This is your practical guide to getting it right, every single time.
First, let's get the language straight. Three key measurements determine whether a body will fit your chassis, and you’ll find these listed on all our product pages. Understanding them is the first step to a successful mount, saving you time and frustration.
Demystifying Key Dimensions
Think of these numbers as your chassis's unique fingerprint. Matching them to the specifications of our rc car bodies is the secret to avoiding guesswork and guaranteeing a perfect pairing before you even open the package.
Here are the critical dimensions you need to know:
- Scale: This is your starting point, indicating the body's size relative to a full-size vehicle. For competitive on-road racing, the most common scales are 1/10 and 1/12.
- Wheelbase: This is the distance from the centre of the front wheels to the centre of the rear wheels. For most 1/10 touring cars, this is a standard 257mm, but it's always smart to measure your specific chassis just to be sure.
- Width (Track Width): This is the distance between the outside edges of your tires, measured at both the front and rear. The vast majority of 1/10 touring car bodies are designed for a width of either 190mm or 200mm.
By measuring these three dimensions on your chassis and matching them to the product specs on our site, you can confidently select a body that's made to fit.
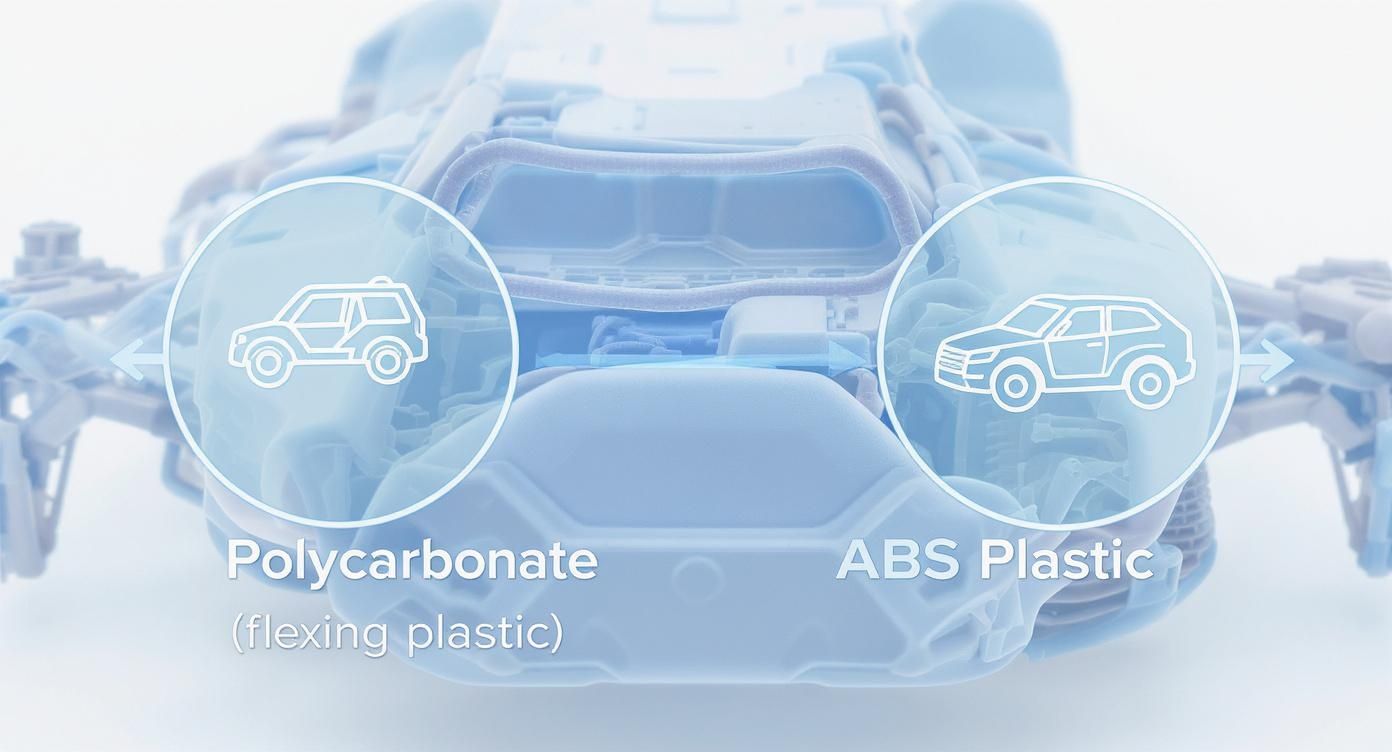
This diagram shows why polycarbonate's resilience is favoured for performance, while ABS is better suited for detailed scale models where durability isn't the top priority.
The Essential Tools for the Job
With a compatible body selected, it's time for the hands-on work. Having the right tools makes the entire process smoother, cleaner, and more precise. You don't need a massive workshop, just a few key items.
- Body Reamer: This specialized tool creates perfectly round, clean holes for your body posts. It’s far better than a standard drill bit, which can easily grab and crack the polycarbonate.
- Curved Lexan Scissors: The curved tip on these scissors makes cutting smooth, rounded wheel wells incredibly easy and clean.
- Fine-Tip Permanent Marker: Essential for marking your post hole locations and trim lines with absolute precision.
- Calipers or a Ruler: For getting accurate measurements of your wheelbase and post locations.
These tools are a solid investment. They'll help ensure every body you mount looks like it was done by a pro.
Step-by-Step Mounting Process
Alright, let's put it all together. Follow these steps for a flawless fit that prevents tire rub and makes sure your body is securely mounted for the track.
- Trim the Body: Before you even think about paint, use your curved scissors to carefully cut along the trim lines of the body, including the wheel wells. Take your time here—smooth, clean edges make all the difference.
- Mark the Post Holes: Place the clear, untrimmed body over your chassis. From underneath, use your fine-tip marker to mark the exact centre of each body post. This is the most critical step for getting perfect alignment.
- Drill the Holes: Use your body reamer to slowly and carefully create the holes where you made your marks. Start small and gradually enlarge the hole until the body post fits snugly. Don't rush it.
- Test Fit: Mount the body on the posts and check everything. Look at the ride height and wheel well clearance. Make sure the tires don't rub against the body when the suspension is fully compressed or when the wheels are turned lock-to-lock. If needed, you can ream the holes slightly larger for minor corrections.
A great pro tip for perfect alignment: colour the tips of your body posts with a marker. When you press the clear body down onto the chassis, the ink will transfer, giving you perfect drill points every single time.
This methodical approach guarantees a professional result. The importance of scale-accurate and well-fitted bodies is especially huge in competitive racing. In the Southern California RC market, for example, licensed and scale bodies are a major driver of sales. Vendors at major events report that scale bodies can account for 30–40% of all RC car-related sales, with some enthusiasts owning over a dozen different bodies for a single chassis. You can learn more about the impact of scale bodies in professional RC racing on latimes.com.
A Beginner's Guide to Custom Painting
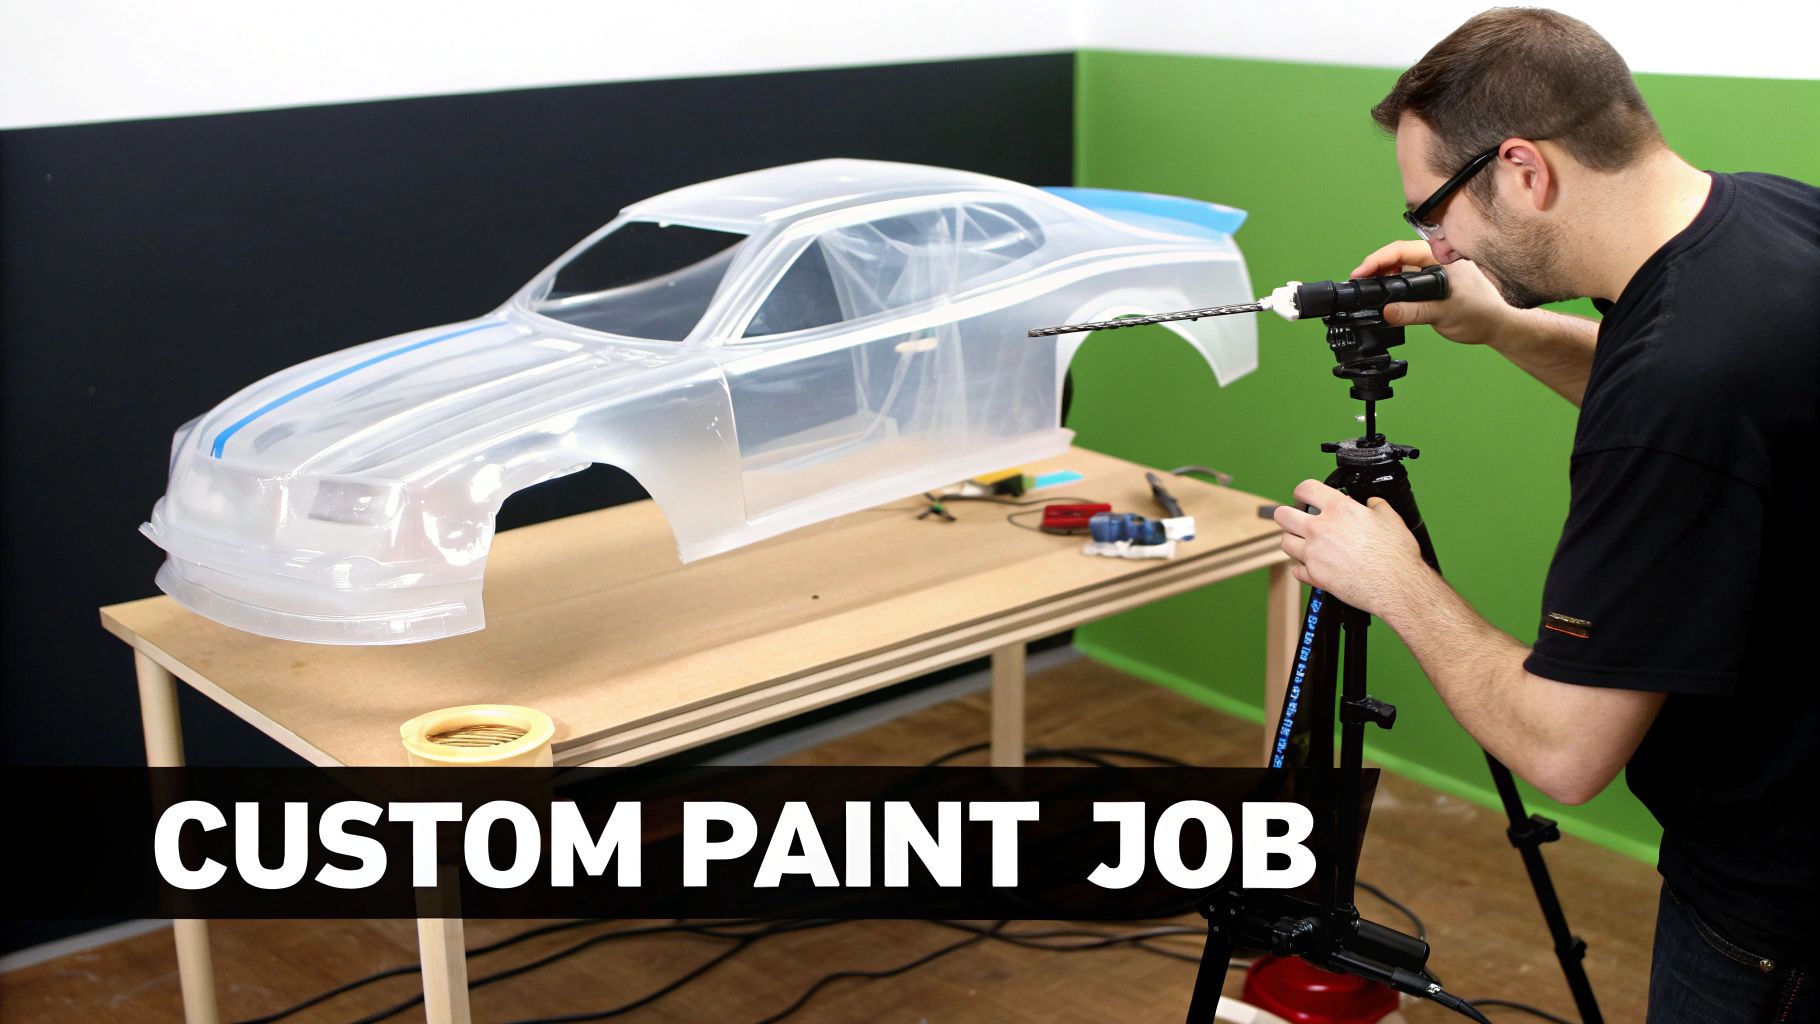
There’s nothing more rewarding in this hobby than peeling the protective film off a freshly painted, one-of-a-kind RC body. It’s where your personality meets the machine. The process of turning a clear, flimsy shell into a finished masterpiece is a core part of what makes RC so great.
This guide will walk you through the whole process, from that crystal-clear shell to a race-ready work of art that’s uniquely yours.
The journey doesn't start with a spray can—it begins with careful preparation. Trust me, this is the most critical stage. Getting this part right is the secret to a flawless finish that actually lasts.
The All-Important Preparation Phase
Before a single drop of colour hits the shell, the inside of your polycarbonate body has to be spotless. Even a brand-new body is coated with mould-release agents left over from manufacturing, and that stuff will repel paint like water off a duck's back.
A simple wash with warm water and dish soap is all it takes. Gently scrub the entire inner surface, rinse it thoroughly, and then let it air dry completely. Don't use a towel; it will leave behind tiny lint fibres that become permanent, fuzzy reminders trapped in your paint.
Once it's perfectly clean and dry, it’s time to mask up your design. This is how you get those crisp lines for windows, racing stripes, and intricate graphics. You've got two main options here:
- Masking Tape: Look for hobby-specific tape. It's flexible enough to handle curves and has an adhesive that won’t leave a sticky mess behind.
- Liquid Mask: This is a paint-on liquid that dries into a rubbery film. You can then carefully cut your design into it with a hobby knife and peel away sections as you paint each colour.
For your first few projects, stick with the pre-cut window masks that often come with the body and some high-quality masking tape. It's the easiest way to learn. A great canvas to practice on is a versatile shell like the Team C Special Twist 1/10 touring car body, which has clean, simple lines perfect for custom designs.
Painting From The Inside Out
Here's the part that surprises a lot of newcomers: you paint the inside of a polycarbonate RC body. It might feel completely backward at first, but it’s a brilliant technique that offers incredible protection for all your hard work.
By applying the paint to the inner surface, the clear polycarbonate itself becomes a permanent, ultra-durable clear coat. Every scuff, scratch, and impact from the track happens on the outside of the shell, leaving your paint job underneath perfectly untouched.
This inside-out method is the secret to a long-lasting, glossy finish. It ensures your custom design stays vibrant and protected from the brutal realities of the racetrack, run after run.
This technique requires you to think in reverse. You have to apply your colours in the opposite order, starting with the darkest shades or fine details first, and finishing with your main, lightest base colour. For example, if you want black racing stripes over a white body, you would spray the black stripes first. Let them dry completely, then back the entire body with white.
Using The Right Paint and Layering Colours
You absolutely cannot use just any spray paint on a polycarbonate shell. That can of paint from the hardware store is far too rigid. The moment your flexible body takes a hit, that paint will crack, flake, and peel right off.
You must use paints specifically formulated for polycarbonate (often labelled "For Lexan"). These paints have special additives that allow them to etch into the plastic and remain flexible, bending with the body instead of breaking away. This is the difference between a durable finish and one that’s ruined after the first lap.
Following a few simple steps when painting can make all the difference between an amateur job and a pro-level finish.
Essential Steps for a Professional Paint Job
Here’s a quick checklist to guide you through the critical stages of preparing and painting your clear polycarbonate body.
| Stage | Action Required | Key Tip |
|---|---|---|
| 1. Preparation | Wash the inside of the body with warm, soapy water. | Air dry completely. Do not use a towel to avoid lint. |
| 2. Masking | Apply window masks and masking tape for your design. | Press down all tape edges firmly to prevent paint bleed. |
| 3. First Colour (Darkest) | Apply your darkest colour or detail layer first. | Use several light coats instead of one heavy coat. |
| 4. Subsequent Colours | Apply other colours, working from darkest to lightest. | Allow each colour to fully dry before applying the next. |
| 5. Backing Coat | Apply a final backing coat of white or silver. | This makes your main colours appear brighter and opaque. |
| 6. The Reveal | Apply decals to the outside, then peel the outer protective film. | Pull the film slowly to reveal the clean, glossy finish. |
Once your final coat is fully cured, it's time for the big moment. Carefully apply your decals to the outside of the body, then slowly peel off that outer protective film. This final step removes all the overspray and reveals the deep, glossy shine of your brand-new, custom-painted RC car body.
Using Your Body for Performance Tuning
For a competitive racer, an RC car body is so much more than a cosmetic shell. It’s one of the most powerful and easily adjustable tuning tools you have. The body's shape, weight, and aero features have a direct, noticeable impact on how your car feels and behaves on the track. Understanding this relationship lets you turn a simple piece of polycarbonate into a real performance advantage.
At its core, a body's primary job on the performance side is to manage airflow. Just like a full-size race car, every element—from the rear wing and front splitter to the rake of the windshield—is engineered to manipulate the air moving over and under the car. This manipulation creates downforce, an aerodynamic force that literally pushes the car down onto the track surface.
More downforce means more grip. And more grip translates directly to higher cornering speeds and more predictable, confidence-inspiring handling. As you look through our collection of rc car bodies, you'll find a whole spectrum of designs, from high-downforce models with aggressive wings and splitters to sleek, low-drag options built for pure straight-line speed.
Harnessing Aerodynamics for Grip and Control
The most obvious aerodynamic feature on any touring car body is the rear wing. A well-designed wing generates a significant amount of downforce right over the rear tires, planting the back of the car and providing crucial stability during high-speed cornering and hard acceleration. This is what keeps the rear end from feeling loose or stepping out when you get on the power.
Up front, the splitter and the overall shape of the nose do the same job for the front tires. An aggressive front end directs air efficiently over the body, creating downforce that gives you more steering grip. This is absolutely essential for getting the car to turn in sharply and hit your apexes on tight, technical sections of the track.
Choosing the right body is really an exercise in balancing front and rear grip. A body with too much rear downforce can cause the car to understeer (or "push"), while too much front downforce can make the rear end feel unstable and loose. The goal is to find a body that complements your chassis setup and the specific track you're on.
By simply swapping from one body style to another, you can completely change your car’s handling balance. This makes it a fast and effective tuning option, often quicker and easier than making mechanical tweaks to your suspension.
The Critical Role of Weight and Balance
It isn’t just about aerodynamics. The physical weight of the body itself is a huge tuning factor. Polycarbonate bodies come in different thicknesses, typically ranging from ultra-lightweight (around 0.5mm) to standard (around 0.7mm) or even heavy-duty versions. This tiny difference in weight makes a big difference on the track.
A lighter body lowers the car’s overall centre of gravity (CG). A lower CG means less body roll in the corners, which makes the car feel more responsive and allows it to change direction much more quickly. This is often the go-to choice for high-grip surfaces like carpet, where nimble, agile handling is king.
On the flip side, a slightly heavier body can sometimes be a real asset on low-grip or bumpy tracks. That little bit of extra weight up high can help the car feel more planted and stable, smoothing out its response to your inputs and settling the car over track imperfections. It’s all about finding what works for the conditions.
Strategic Cutouts for Cooling and Performance
Modern RC electronics, especially in high-power touring car classes, generate a ton of heat. A body’s vents and cutouts aren't just for looks; they are absolutely vital for managing those temperatures. Getting proper airflow over your motor and ESC is crucial for maintaining consistent, fade-free performance through a long main.
Strategically placed vents can channel cool air exactly where it’s needed most. Many of our high-performance bodies feature optional cutout areas that you can open up to dramatically improve cooling without totally wrecking the body’s aerodynamic profile. This lets you tailor the cooling to your specific electronics and the ambient temperature on race day.
By thoughtfully selecting a body from our store, you can find the perfect match for any track condition—whether you need aggressive steering for a tight indoor circuit or maximum stability for a wide-open, high-speed layout.
How to Repair and Protect Your RC Bodies
Your RC car body is meant to take a few hits on the track, but it's not bulletproof. Every bump, scrape, and vibration adds up, eventually leading to cracks and tears. The good news is that with a little proactive care and the right repair tricks, you can keep that body in one piece for a lot longer.
This isn't just about saving money—it's about protecting your custom paint job and keeping your car looking sharp. By reinforcing the known weak points before they fail, you turn a fragile shell into a durable shield for your electronics. A few minutes of prep can save you a lot of headaches down the road.
Proactive Reinforcement Techniques
The best way to fix a crack is to stop it from happening in the first place. On any rc car body, there are a few predictable spots that always seem to fail first: the areas around the body post holes, the wheel arches, and anywhere the body touches the side guards. These zones take the brunt of every impact and all the chassis flex.
A simple trick is to apply a thin, flexible adhesive to the inside of the body in these key areas. This creates a shock-absorbing layer that prevents the polycarbonate from cracking under pressure. For serious durability, you can lay down some drywall tape first and then coat it with adhesive. The combination provides incredible structural support.
Think of it like adding a flexible roll cage directly to the body itself. The adhesive and tape work together to spread impact forces over a wider area, so no single point takes all the damage and splits.
It's a small time investment that pays off big in the long run.
How to Repair Existing Cracks and Splits
If a crack has already shown up, don't panic. Most damage is totally fixable. The goal is to stop the crack from spreading while restoring the body's strength. First things first, clean the damaged area on the inside of the body with some isopropyl alcohol. You need a clean surface for the adhesive to get a good grip.
For a clean and professional fix, a specialized adhesive is your best bet. A great option is a purpose-built solution like the ORCA Lexan Body Reinforce & Repair Glue Set, which uses a UV-curing process to create an incredibly strong, clear bond in seconds. Just apply the glue along the crack and hit it with the UV light.
For bigger splits, you can bridge the gap with a piece of drywall tape, saturate it with the glue, and then cure it. This method creates a permanent repair that’s often stronger than the original material, getting your body back on the track where it belongs.
Common Questions About RC Car Bodies
Picking the right RC car body can feel a bit overwhelming, especially when every little detail counts on the track. Here are the answers to the questions we hear most from racers looking to fine-tune their setup.
What's the Best RC Car Body Thickness?
This really comes down to the track you're running on and the feel you're looking for.
For high-grip tracks like carpet, a lot of competitive drivers prefer an ultra-lightweight body, usually around 0.5mm. Going this thin lowers your car's centre of gravity, making it feel sharper and more aggressive in the corners. It's all about maximising agility.
On the flip side, for a lower-grip or bumpy track, a standard weight body (around 0.7mm) can actually be your best friend. That tiny bit of extra weight up top helps the car feel more planted and stable, which can make it a lot easier to drive consistently when the grip isn't quite there.
How Do I Know Which Body Fits My Car?
Making sure a body fits your chassis is thankfully pretty straightforward. You just need to match three key specs, which you'll find on all of our product pages.
- Scale: Most on-road racing is either 1/10 or 1/12 scale.
- Wheelbase: This is just the distance from the centre of your front wheels to the centre of your rear wheels. For almost every 1/10 touring car, this is a standard 257mm.
- Width: This measures the distance from the outside of your tires. Most touring cars are either 190mm or 200mm wide.
Match those three numbers on our site to your car's chassis, and you've got a guaranteed fit.
Do I Really Have to Use Polycarbonate-Specific Paint?
Yes, this is one area where there are no shortcuts. If you use standard spray paint from the hardware store, it's just too brittle. The first time your car takes a light hit, that paint will crack, flake, and peel right off the flexible body.
Paints made specifically for Lexan or polycarbonate are chemically designed to stay flexible. They contain additives that gently etch into the plastic, creating a bond that bends along with the body during an impact. This is the secret to a durable, race-winning paint job that actually lasts.
Can I Use the Same Body for Different Tracks?
You absolutely can, but serious racers almost always have a few different RC car bodies in their pit box to tune their car's handling. Think of it as another setup tool.
For a tight, technical track, you'll want a high-downforce body with a big, aggressive wing to get maximum cornering grip. But on a wide-open, flowing track with long straights, a sleeker, low-drag body will give you a noticeable edge in top speed. Swapping bodies is one of the fastest ways to adjust your car’s aerodynamic balance for different layouts.
Find the perfect high-performance body to give you a competitive edge. At digital-rc, we stock a curated selection of race-proven shells for 1/10 touring and 1/12 pan cars. Explore our collection and get fast, same-day delivery at https://digitalrc.ca.