
Build: RC Car Kit Build for Beginners
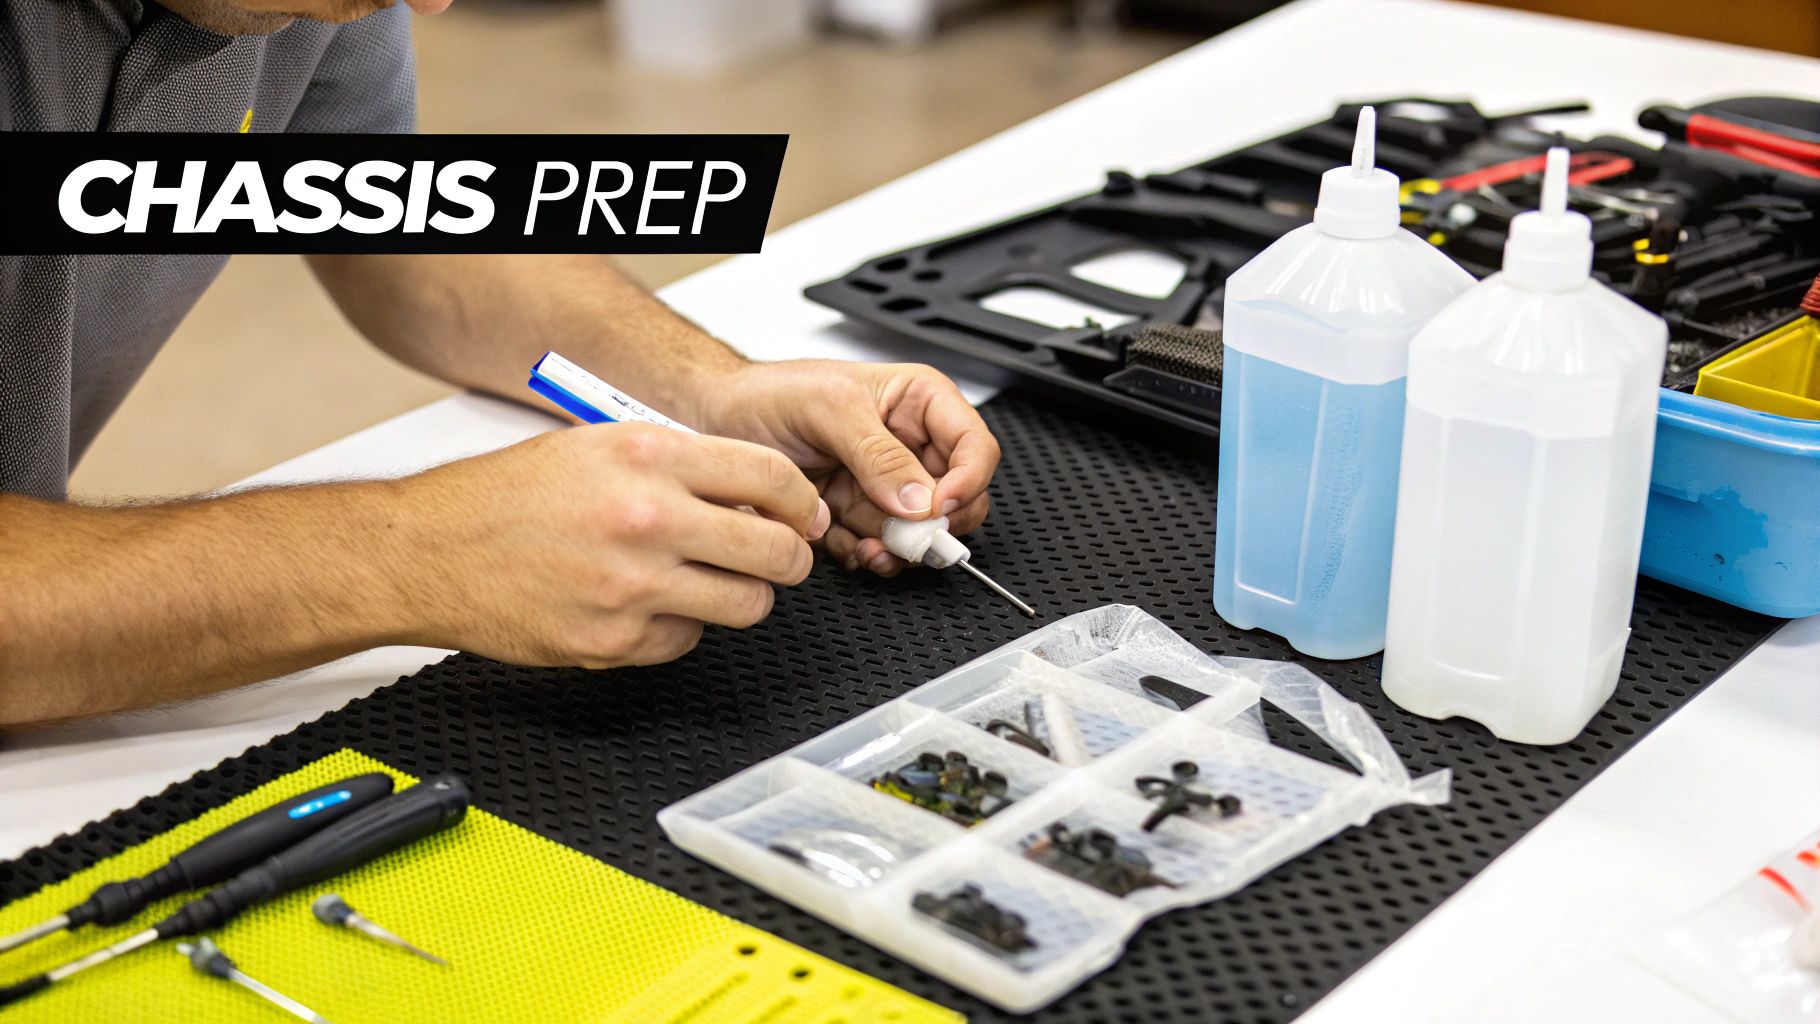
Embarking on a new RC car kit build is one of the most satisfying parts of the hobby. There's nothing quite like turning a box of meticulously engineered parts into a track-ready machine. But before you even think about the chassis, the real work begins at your workbench. A clean, organized space with the right tools and electronics is the foundation for a smooth build and, ultimately, a faster car.
Gathering Your Essential Toolkit And Electronics
A successful build is all about preparation. Laying out every tool and component before you open the first bag of parts will save you headaches and prevent simple mistakes. Think of your toolkit as your personal pit crew—investing in quality gear is often the difference between a podium finish and a frustrating DNF (Did Not Finish).
The demand for high-end, customizable kits has never been stronger. Racers want precision and control, and top-tier kits like the XRAY X4 or Awesomatix A12 deliver that. In key markets, it’s not uncommon for kit versions of popular models to make up 40% of sales, showing just how much the community values the building process itself.
Your Build Toolkit And Electronics Checklist
Here’s a quick-reference guide to the tools and electronics you'll need for a typical 1/10 touring or 1/12 pan car build. We've hand-picked these items based on what we use in our own shop—they're the essentials that get the job done right.
| Item Category | Specific Tool/Component | Why It's Essential |
|---|---|---|
| Hand Tools | Precision Hex Drivers (1.5, 2.0, 2.5mm) | Prevents stripping tiny M3 screw heads. Absolutely non-negotiable. |
| Hand Tools | Nut Drivers (5.5mm, 7.0mm) | For wheel nuts and other M3/M4 nuts. Much better than a multi-wrench. |
| Specialty Tools | Shock Pliers | Grips shock shafts without scratching them and helps install ball ends. |
| Specialty Tools | Hobby Knife | Cleans up plastic parts from trees and handles precise trimming jobs. |
| Electronics | Electronic Speed Control (ESC) | The "brain" that translates your radio inputs into motor commands. |
| Electronics | Brushless Motor | Your car's powerhouse. Choose a spec-class or modified motor for your needs. |
| Electronics | High-Torque Servo | Fast and precise steering is critical for hitting your lines consistently. |
| Electronics | 2S LiPo Battery | The "fuel tank" for your car. Stick to quality, race-approved packs. |
| Fluids & Adhesives | Thread-Locking Compound (Blue) | Secures metal-to-metal screws and prevents them from vibrating loose. |
| Fluids & Adhesives | Shock & Diff Oils | Used to fine-tune your suspension and differential for track conditions. |
Having these items on hand before you start will make the entire process more enjoyable and ensure your car performs exactly as it was designed to.
The Non-Negotiable Tools
Some tools are simply indispensable for building modern RC kits. Trying to get by without them almost always leads to stripped screws, damaged components, and a whole lot of frustration. If you're going to invest anywhere, start with a set of high-quality hex drivers.
- Precision Hex Drivers (1.5mm, 2.0mm, 2.5mm): These will be in your hands for most of the build. Drivers with hardened tips are a must-have to avoid rounding out the heads on the small M3 screws found everywhere on 1/10 scale cars.
- Nut Drivers (5.5mm, 7.0mm): Essential for wheel nuts and the various M3 and M4 nuts used across the chassis.
- Shock Pliers: This is a fantastic multi-tool. It lets you securely grip shock shafts without leaving scratches and makes popping ball ends on and off effortless.
- Hobby Knife: Perfect for cleaning the little nubs off plastic parts trees for a perfect fit and trimming away any excess material.
A classic rookie mistake is relying on the cheap, L-shaped hex keys included in some kits. They offer poor leverage, feel terrible in your hand, and are notorious for stripping screw heads. A proper set of drivers is the single best investment you can make in this hobby.
Essential Electronics and Fluids
With your tools ready, it's time to choose the heart of your machine. Here at Digital RC, we focus on race-proven components designed specifically for the demands of 1/10 touring and 1/12 pan car racing.
Your core electronics package will consist of:
- Electronic Speed Control (ESC): This is the brains of the operation, controlling the motor.
- Brushless Motor: The powerhouse that delivers speed and torque.
- High-Torque Servo: Controls your steering. A responsive and reliable servo is key to precision driving.
- LiPo Battery: Your fuel tank. For 1/10 touring, a 2S LiPo is the standard.
As you get your electronics ready, it’s critical to know how to safely store your RC car's lithium batteries to prevent any issues. You'll also need a solid charger; our guide on the best LiPo battery charger can help you pick the right one.
Finally, don't overlook the fluids and chemicals that keep your car running smoothly. A small bottle of thread-locking compound is mandatory for any metal-to-metal screw connection to keep it from vibrating loose. And you'll absolutely need high-quality shock and differential oils to tune your car's handling for the track.
Mastering Pre-Build Prep And Chassis Assembly
I get it. The temptation to rip open the parts bags and just start building is huge. But this is the first place where seasoned racers separate themselves from the crowd. A little patience and a methodical pre-build routine are the real secrets to a flawless assembly and a car that actually performs predictably on the track.
Think of it like being a chef. You wouldn't just toss all your ingredients into a pan and hope for the best. A top-tier rc car kit build requires the same discipline—every single component needs to be prepped and perfect before it ever touches the chassis.
The Pre-Flight Checklist
Before you even think about turning a screw, lay out your manual and all the sealed parts bags. Go through them, one by one, checking the contents of each bag against the manual's inventory. It’s rare, but packaging mistakes happen. Finding out you're missing a critical part at 10 PM on a Friday is a feeling I wouldn't wish on anyone.
With everything accounted for, turn your attention to the plastic parts trees.
- Trim, Don't Rip: Use a sharp hobby knife or precision side-cutters to remove parts. Snip a little bit away from the part itself, then come back and carefully shave the remaining nub flush.
- Hunt for Flashing: Inspect parts like suspension arms and hubs for thin, excess plastic "flashing" along the mould lines. This stuff is a silent killer of performance, causing binding and preventing your suspension from moving freely.
- Clean and Smooth: Gently scrape or sand away any flashing you find. The goal is to ensure every part is perfectly smooth and fits exactly how the engineers designed it. This small step has a massive impact on your car's consistency.
This level of detail guarantees that components move without any unwanted friction, which is the cornerstone of a responsive and predictable suspension system.
Sealing Your Carbon Fibre Chassis
Modern touring car kits like the XRAY X4 or Awesomatix A12 come with beautifully machined carbon fibre chassis plates. They're incredibly strong and light, but they have one weak spot: the exposed edges. A hard hit can cause the layers to separate—what we call "delaminating"—which ruins the chassis and completely changes its flex characteristics.
The pro solution is surprisingly simple: seal the edges with a thin layer of CA glue (cyanoacrylate).
Grab a glue tip or even a cotton swab and apply a very thin bead of medium-viscosity CA glue along all the exposed outer edges of the main chassis, top deck, and shock towers. Let it dry completely. This creates a rock-hard, protective barrier that stops delamination in its tracks and dramatically extends the life of your expensive carbon fibre.
Sealing carbon fibre edges is one of those five-minute jobs that will save you from a costly replacement down the road. It reinforces the material against side impacts and moisture, ensuring your chassis keeps performing as intended for a long, long time.
Building a Square and True Foundation
With all the parts prepped and ready, the assembly can finally begin. Your number one goal here is to build a chassis that is perfectly "square" and "true." That means it isn't twisted or tweaked in any way. A tweaked chassis is impossible to tune; it will always handle inconsistently, turning better in one direction than the other.
Your assembly process is the first and best line of defence against this.
- Start Screws By Hand: Always, always thread screws into plastic or aluminum by hand for the first few turns. This gives you the feel you need to know the screw isn't cross-threading, which can permanently wreck a part.
- Use Thread-Lock Correctly: Blue thread-locking compound is only for screws going into metal, like a motor mount or aluminum suspension block. Apply a tiny drop to the screw's threads, not in the hole. Never use it on screws going into plastic.
- Tighten in a Pattern: When you attach parts like bulkheads or the motor mount, just snug all the screws down lightly at first. Then, go back and tighten them fully in a crisscross pattern, just like you’d tighten the lug nuts on a real car.
This gradual, even pressure is what prevents you from accidentally building a twist into the chassis. By taking your time here, you’re laying down the single most important factor for predictable handling: a perfect foundation.
Installing Your Drivetrain and High-Performance Electronics
With a perfectly squared-up chassis ready on your bench, it's time for the exciting part: bringing it to life. This is where your build transforms from a static collection of parts into a responsive, high-performance racing machine. Installing the drivetrain and electronics is a methodical process, and paying close attention to the details here directly translates to reliability and speed on the track.
The popularity of the RC car kit build has exploded, especially in tight-knit hobbyist communities. It’s no surprise, as enthusiast applications make up a massive 70% of the RC market share. We've even seen this trend grow through educational STEM programs, where thousands of students have built RC kits, boosting local hobby shop sales by as much as 22%.
Setting The Perfect Gear Mesh
Getting the gear mesh right is one of the most critical steps in any build. This is the physical spacing between the motor's pinion gear and the chassis's spur gear. If it’s too tight, you’ll create a ton of friction and heat, robbing you of power and chewing up your gears and motor. Too loose, and the gears can slip or strip their teeth completely under hard acceleration.
A tried-and-true method for getting a perfect mesh is the "paper trick."
- First, loosen the motor mount screws so you can slide the motor freely.
- Place a small strip of regular printer paper between the pinion and spur gears.
- Push the motor firmly against the spur, pinching the paper between the gear teeth.
- While holding the motor steady, tighten the motor mount screws down securely.
- Finally, rotate the spur gear by hand to work the paper out.
That tiny gap left by the paper’s thickness creates the ideal amount of backlash. You should be able to feel a tiny bit of play when you gently rock the spur gear back and forth while holding the pinion still. This small detail is the key to maximum power transfer with minimal drivetrain drag.
Mounting And Centring Your Steering Servo
Your servo translates your steering inputs into action, so mounting it correctly is vital for consistent, predictable handling. Before you even think about installing it in the chassis, you need to centre it.
Hook up your servo, like a Sanwa PGS-LHII, to your receiver and power on your electronics. Make sure your transmitter's steering trim is set to neutral (zero), and the servo will automatically find its centre point. Now you can attach the servo horn or servo saver to the output spline, getting it as close to perfectly perpendicular to the servo body as you can.
Hold off on attaching the steering linkage to the servo horn for now. Mount the centred servo in the chassis first. Then, build and adjust your steering turnbuckles to the lengths specified in the manual. This approach ensures your steering geometry starts from a perfectly neutral and balanced position.
Professional Soldering For Bulletproof Connections
Clean, strong solder joints are the signature of a professional build. A bad connection is a ticking time bomb that can fail mid-race, leading to a frustrating DNF. For a typical setup with components like a Hobbywing XR10 ESC and a Team Powers motor from our shop, you'll be soldering bullet connectors and your main battery plug.
- Tin Everything First: This is the secret to a fast, clean joint. "Tinning" just means applying a thin layer of solder to both the wire tip and the inside of the connector before you try to join them.
- Use Enough Heat: A weak soldering iron just won't cut it. It won't get the parts hot enough, resulting in a "cold" solder joint that is brittle and completely unreliable. I recommend an iron with at least 60-80 watts of power.
- Heat the Part, Not the Solder: Touch the hot iron tip to the connector or wire. Let it heat up for a couple of seconds, then apply the solder to the part itself. The solder should flow instantly and smoothly.
To get a better understanding of the brain of your car's power system, check out our guide on how an RC Electronic Speed Control works. Knowing how it functions really helps you appreciate why clean, reliable wiring is so important.
Arranging Electronics for Optimal Balance
The final assembly step is placing your ESC, receiver, and transponder on the chassis. The entire goal here is to achieve the best possible weight balance from left to right. Before you stick anything down with double-sided tape, place your car on a setup station or a set of balance pins.
Move the components around on the chassis and see how their placement affects the side-to-side balance. In most modern touring cars, you'll place the ESC and receiver on the opposite side of the motor to help counteract its weight. A well-balanced car just feels more planted and consistent through both left- and right-hand corners, giving you the confidence to push it harder.
Building Perfect Shocks and Nailing Your Baseline Setup
A car’s handling is born in its suspension, and the heart of that suspension is a perfectly built set of shocks. This is one of those areas where paying close attention to the small details pays off big time on the track. A silky-smooth, air-free shock is what gives you a car that feels planted, predictable, and consistent lap after lap.
Once the shocks are built and on the car, the next job is to lock in a solid baseline setup. This isn’t just about making the car look right; it’s about creating a neutral, reliable starting point you can tune from.
The Art of the Perfect Shock Build
Building four identical, air-free shocks is a skill every serious racer needs. Any air trapped inside will make the shock feel spongy and inconsistent, which absolutely ruins your car’s handling. The secret is to be slow and methodical, giving the air time to escape.
First, mount the shock body securely in a stand and slowly fill it with your chosen shock oil, leaving about 5mm of space at the top. You’ll see tiny air bubbles floating in the oil.
Just let the shocks sit for 10-15 minutes. While you're waiting, you can gently cycle the piston up and down a few times—without pulling it out of the oil—to help knock loose any air trapped underneath it.
Next, top off the oil so it’s just slightly domed over the top of the shock body. Carefully thread the shock cap on a few turns, then slowly compress the shock shaft. You should see the excess oil and any remaining air bleed out of the small hole in the cap.
Once the shaft is fully compressed, finish tightening the cap and pop in the bleeder screw. Now, check your work. The shock should feel smooth through its entire stroke with no gurgling sounds. When you compress it and let go, it should rebound consistently. Do this for all four, making sure they all feel and rebound exactly the same. Consistency is king here.
Pro Tip: After your first run, it's always a good idea to re-check your shocks. The initial shakedown can sometimes release tiny air bubbles that were trapped during the build. A quick re-bleed ensures they are perfect for the next race.
Establishing Your Foundational Kit Setup
With your flawless shocks mounted, it’s time to set the car's initial geometry. This "baseline setup" is your neutral starting point—think of it as zeroing your rifle before you start aiming. For this, you’ll need some dedicated setup tools to dial in three critical parameters.
- Ride Height: This is the gap between the bottom of your chassis and the setup board. It controls the car's centre of gravity and how it transfers weight. A lower ride height usually gives more grip on smooth surfaces but can cause the chassis to bottom out on bumps. A great starting point for asphalt touring cars is between 5.0mm and 5.5mm.
- Camber: This is the angle of the tire when you look at it from the front or rear. Negative camber (when the top of the tire leans in) helps the outside tire keep a bigger contact patch on the track during cornering, which boosts grip. A solid starting point is usually -1.5 to -2.0 degrees.
- Droop: This setting dictates how far the suspension arms can travel downwards. More droop allows for more weight transfer, which can be a good thing on bumpy or low-grip tracks. Less droop can make the car feel sharper and more aggressive. Droop is a critical tuning option and is measured with a specific gauge.
The build process is a logical flow, moving from one stage to the next, as shown here.
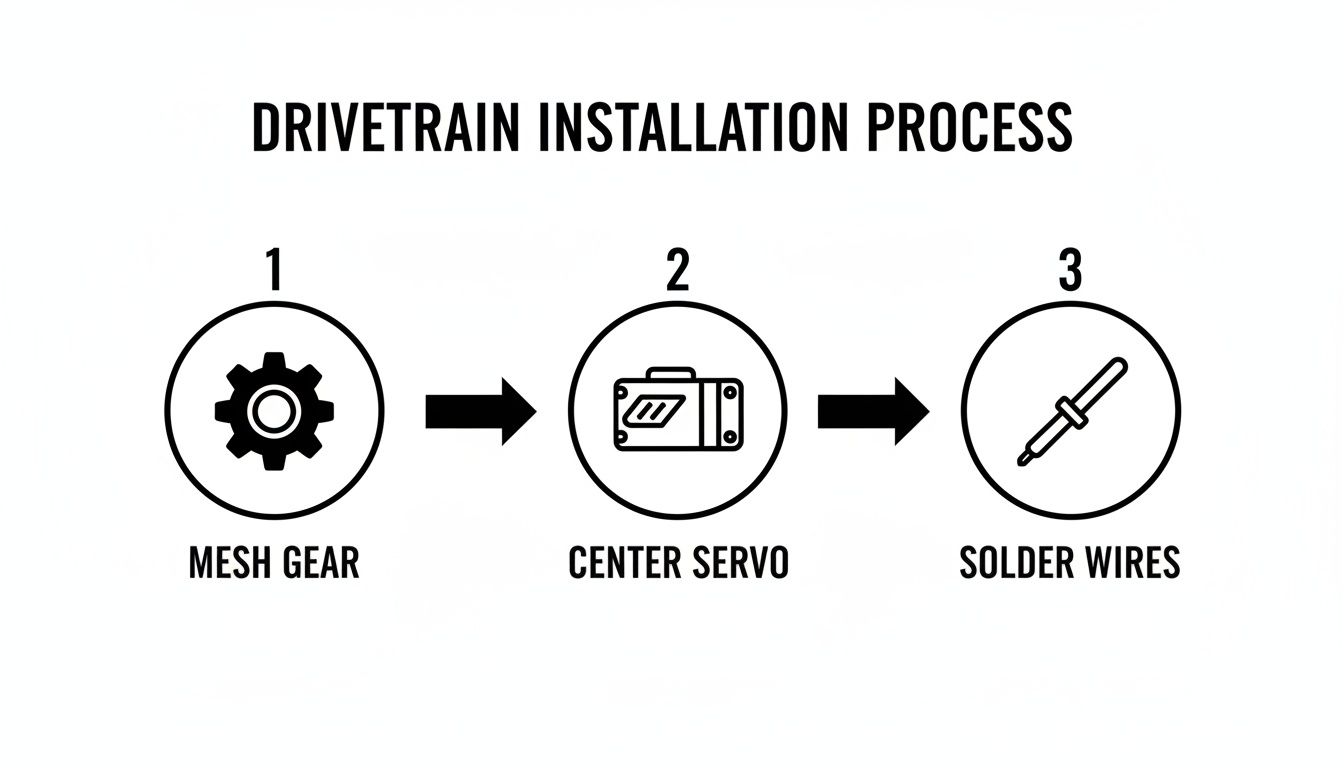
This just helps visualize how the mechanical setup flows right into the electronics integration, which is key for a reliable car.
Why This Baseline Matters
Starting with a known, neutral setup is crucial because it gives you a repeatable foundation. If you just guess your settings, you’ll be completely lost when you try to make adjustments at the track. You won't know if a change actually helped because you have no consistent reference point to go back to.
By carefully setting your ride height, camber, and droop according to the kit's manual, you’re starting from a point the car's designers have already tested and proven. This lets you focus on your driving for the first few runs, getting a feel for the car before you start tweaking it to match your style or the track conditions.
Final Touches And Your First Shakedown Run
Your car is built, the electronics are humming, and your setup sheet is looking good. You're almost there. But these last few steps are what separate a clean, reliable race car from one that suffers a rookie mistake on its first lap out of the pits. Let's make sure all your hard work pays off when the tires hit the pavement.
One of the most overlooked details is checking for body rub. It seems small, but it can completely ruin your car's handling. With your wheels on, set the car to its final ride height. Now, push down on the chassis to fully compress the suspension and turn the steering from full lock to full lock. Do the tires touch the inside of the wheel wells at all? Even the slightest rub can unsettle the car in a corner or, worse, cause the body to tuck under and end your run. Trim the wheel wells carefully until you have total clearance.
This kind of attention to detail is a hallmark of the RC scene, which has seen some incredible growth lately. In fact, some clubs in Southern California have reported a 35% increase in electric kit builds, which isn't surprising given the state's booming interest in full-scale EVs. It’s cool to see builders creating custom 1/10 scale kits that mirror what's happening in the real automotive world.
Breaking In Your Ball Differential
If your kit came with a ball differential, it needs a gentle break-in before it ever sees the track. A brand-new ball diff often feels a little gritty as the carbide balls and metal plates start to wear into each other. A proper break-in smooths everything out and gives you that buttery, consistent action you want.
It's simple. Hold both rear wheels so they can't spin and apply just a little bit of throttle for about 30-45 seconds. You're just letting the differential action do its thing internally. Let it cool down for a minute, then repeat the process two or three more times. This little bit of prep ensures your diff is perfect from lap one.
Your First Shakedown Laps
The first time your car hits the track is for a "shakedown run." This isn't about setting blistering lap times—it's about listening and feeling for any potential issues before you really push it.
Start by driving at a slow to medium pace. Pay attention. What do you hear? How does the car feel?
- Listen for Noise: Is the drivetrain screaming? A high-pitched whine usually means your gear mesh is too tight.
- Check for Straight Tracking: On the straightaway, let go of the steering wheel for a second. Does the car pull to one side? If so, your steering trim is off, or the servo wasn't perfectly centred.
- Observe Handling: Does the car feel balanced turning left and right? If it feels different in one direction, you might have a tweak in the chassis or an issue with your shocks.
Finding the right spot for this is key. If you need help, our guide on finding an RC car track near me can point you to a local venue perfect for your first run.
The goal of a shakedown is data collection, not speed. Run the car for two or three minutes, bring it back into the pits, and check everything over. Look for any loose screws and check your motor and ESC temperatures. This disciplined approach catches small problems before they become big ones.
If you run into an issue, don't sweat it. Most problems on the first run are simple fixes. We've put together a quick guide to help you figure out what's going on and how to get back on track.
First-Run Troubleshooting Guide
Here's a quick look at some common issues you might encounter during your shakedown and how to sort them out.
| Symptom | Potential Cause | Recommended Solution |
|---|---|---|
| Loud, Whining Drivetrain | Gear mesh is too tight. | Re-adjust the motor position to create a tiny bit more backlash between the pinion and spur gear. |
| Car Pulls to One Side | Steering trim is off, or servo wasn't perfectly centred during install. | Use the steering trim on your transmitter for a quick fix. For a permanent solution, re-centre your servo horn. |
| Steering Feels Unresponsive | Servo saver is too loose or the servo horn screw is not tight. | Tighten the servo saver's spring collar slightly, or check that the screw holding the servo horn is secure. |
| Car Spins Out Easily | Differential is too loose, or rear tires lack grip. | Tighten your ball differential's main screw by 1/8th of a turn. Consider trying a different tire compound. |
After running through this table, your car should be feeling much more dialled in.
And remember, if you realize you need a different part or want a last-minute upgrade before race day, our same-day delivery service in select Canadian areas means digital-rc.ca can get that crucial component to you fast.
Your RC Car Kit Build Questions, Answered
Even after years of building kits, a few questions always seem to pop up. It’s just part of the process. Here are some of the most common things we hear from builders, with straightforward answers to help you get your car dialled in at the workbench.
What Is The Hardest Part Of An RC Car Kit Build?
Honestly, for most people getting into modern kits, two things consistently cause a bit of grief: building perfect shocks and setting a ball differential.
First, getting four shocks to feel exactly the same, with no air bubbles, takes a delicate touch. It’s a skill that requires patience, but it's absolutely critical for a balanced and predictable car on the track.
The second is the ball diff. Unlike a gear diff you just fill with oil, a ball diff needs the tension set just right. Too loose, and it slips coming out of a corner. Too tight, and it feels gritty and inconsistent. Nailing these two steps is a huge milestone in becoming a skilled builder.
The biggest source of frustration isn't one specific step—it's rushing. The best builds come from being methodical. Take your time, read the manual, and enjoy getting each stage perfect before moving on.
How Long Does It Take To Build A 1/10 Scale Kit?
This really comes down to experience. A seasoned racer who’s built a few similar cars can probably knock out a 1/10 touring car like an XRAY X4 or Awesomatix A800R in 6-8 hours of focused work. They know the build order by heart and have all their tools lined up and ready to go.
If this is your first build, give yourself 10-15 hours. Spreading it out over a weekend or a few evenings is a great way to do it. This gives you plenty of time to double-check the instructions, prep your parts properly, and get your soldering done without feeling the pressure. Remember, the build itself is a huge part of the fun.
Do I Really Need To Use Thread-Lock?
Yes, absolutely—but only where the manual tells you to. Thread-lock is a must for any metal-to-metal connection. Think screws going into aluminum parts like motor mounts, suspension blocks, or bulkheads.
The vibration from a high-performance RC car will work those screws loose in no time, and that can lead to a race-ending failure. A small drop of blue (medium strength) thread-lock is all you need. On the flip side, never use it on screws going into plastic. The chemicals can make the plastic brittle and cause it to crack over time.
Which Electronics Should I Choose For My Kit?
That’s a great question, and the answer really depends on what you plan to do with the car. Your electronics are the heart of your setup, and we specifically stock components at Digital RC that are proven for on-road racing.
- Touring Car (Spec Racing): For the big spec classes, you'll want a ROAR-approved ESC like the Hobbywing XR10 paired with a 17.5T or 21.5T brushless motor. Brands like Hobbywing and Team Powers are mainstays at the track for a reason—they just work.
- 1/12 Pan Car: These cars are super light and run on a single-cell LiPo. You'll need a specialized 1S-capable ESC and a motor suited for the class, typically a 13.5T or 17.5T.
- Servo Choice: Don't cheap out on the servo. A fast, strong, and reliable steering servo from a brand like Sanwa is one of the best investments you can make. It's your direct connection to the car, and precision matters.
We often list recommended electronics packages right on the product pages for kits like the Awesomatix or XRAY chassis. This takes the guesswork out of it and ensures you get a compatible, race-proven setup right from the start.
Ready to start your next build or find the perfect electronics for your chassis? At Digital RC, we've curated the best kits, parts, and high-performance components for Canadian on-road racers. Explore our collections and enjoy same-day delivery in select areas. https://digitalrc.ca